
Sizing a commercial diesel generator is serious business. You cannot just add up equipment wattages and call it a day. That is a fast track to system failure. If you undersize the unit, your power will drop when you need it most. If you oversize it, you waste money and damage the engine over time. We need to look at the real math. You must account for how equipment starts, how loads change, and where the generator sits.
This guide cuts through the guesswork. You will learn exactly how to size a diesel generator for real-world setups. We will skip the basic calculators. Instead, we give you a true generator sizing checklist. We break down the right formulas. We explain key generator derating factors. We also show you how to sequence power properly. Let’s get right to the facts.
Step 1: Understanding Power Ratings & The Core Terminology
Before you pick a generator, you must speak the language. Let’s define the core terms so you know exactly what you are buying.
Apparent Power vs. Real Power (kVA vs kW)
You will see two main numbers on any spec sheet: kVA and kW. It is vital to know the difference between kVA vs kW.
Think of kVA as the total power the generator pushes out. This is the Apparent Power. Now, think of kW as the actual power your equipment puts to work. This is the Real Power.
Why are they different? Because some power gets lost creating magnetic fields in motors. We measure this loss with the Power Factor. For most three-phase setups, the power factor is 0.8.
So, you use a simple generator load calculation formula: you multiply the kVA by 0.8 to find the kW. If you have a 100 kVA generator, it gives you 80 kW of real working power.
The Big Three Rating Classes
Generators do not run the same way forever. The ISO 8528 standard breaks them into three clear classes. You must pick the right one for your site.
Standby Power (ESP)
This is your emergency backup. A standby generator runs only when the main grid fails. It gives you the maximum power possible, but only for a short time. You cannot push it past its limit. It has no overload room.
Prime Power (PRP)
Choose this if you have no grid power. Prime generators run all day, every day. The load will go up and down as your site works. A prime unit also gives you a small safety net. It handles a 10% overload for one hour every twelve hours.
Continuous Power (COP)
This is the heavy lifter. A continuous generator runs at a steady, fixed load non-stop. The power demand does not change. You see this in base-load power plants or massive data centers.
Step 2: The Load Calculation Methodology (Deep Dive)
You must know exactly what you are powering. A bad guess will cost you thousands. Let’s break down the real math.
Categorizing Your Loads
Group your equipment first. Put life safety items in one bucket. Put critical operations in another. Put general power in a third. This makes your math much cleaner. It tells you what must run and what can wait.
Steady-State vs. Transient Loads
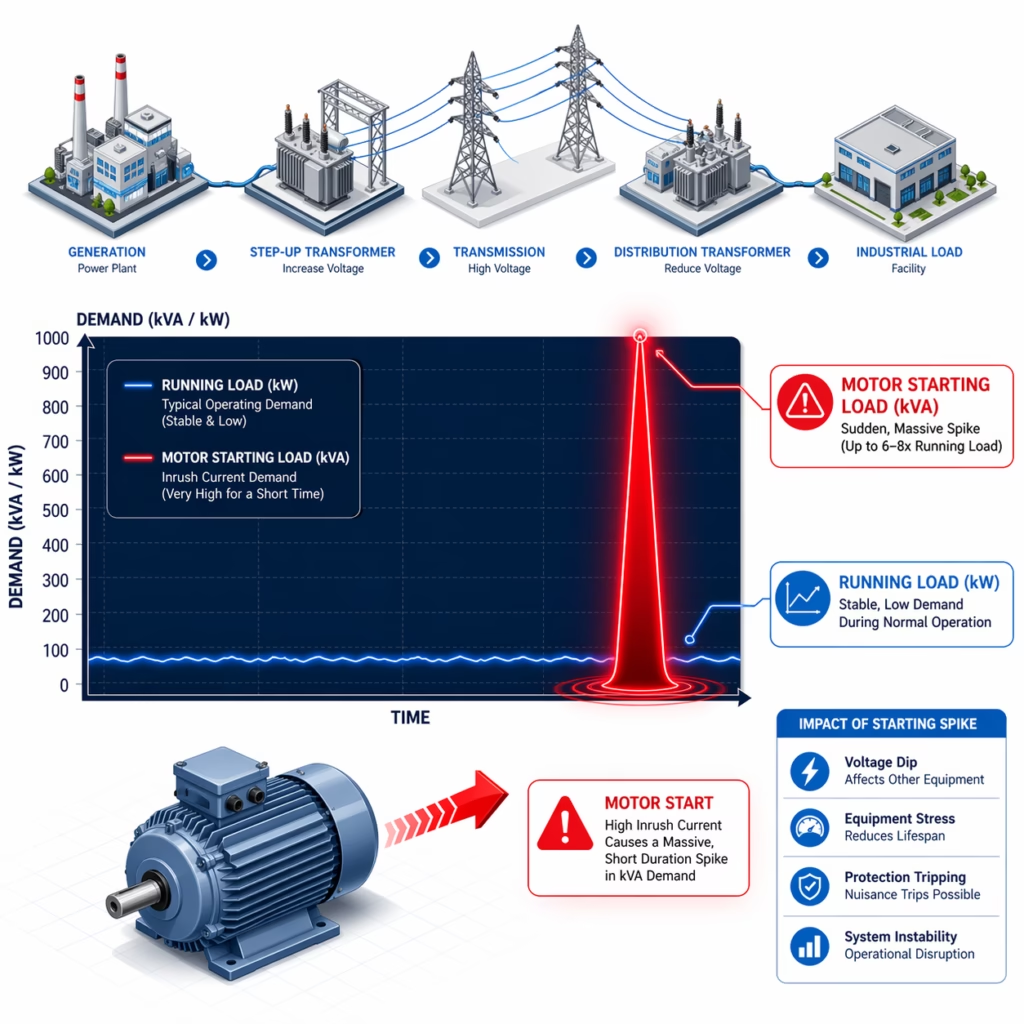
Equipment draws power in two distinct ways. First is the running load. This is the steady power a machine needs to stay on. Second is the starting load. A machine needs a massive power spike just to wake up.
Motor Starting Characteristics
Motors cause the biggest headaches. When a large motor starts, it gulps down power fast. We measure this huge demand as the motor starting kVA. A motor can pull six to ten times its normal power right at the start.
This massive pull causes a sudden drop in power quality. Engineers call this a transient voltage dip. If the voltage drops too much, your lights flicker. Worse, your magnetic contactors fail, and machines stall out. You usually want to keep this dip under twenty percent.
You can fix this easily. Use soft starters or variable speed drives. They ease the motor on. This cuts that massive power spike down to size.
Accounting for Non-Linear Loads
Modern gear acts differently. Computers, LED lights, and backup batteries do not pull power smoothly. They gulp power in weird, choppy chunks. We call these non-linear loads.
These loads create messy power signals. They distort the voltage and heat up the alternator. You often need to oversize your generator to handle this. A good rule is to double the capacity needed for these specific items. This handles the messy power safely.
Manual math is a must. But you need a fast baseline first. Do not waste time guessing your starting numbers. Run your equipment list through a solid DG load calculator right now. This tool hands you your exact baseline kW and kVA fast. You get a clean starting point. Then, you can add your heavy motor spikes and heat loss factors by hand.
Step 3: Step Loading and Sequencing Strategies
You do not have to turn everything on at once. Smart engineers use a better way to save money and space.
What is Step Loading?
Step loading means turning on your power in small, planned chunks. You start one group of machines first. You let the generator catch its breath. Then, you start the next group. This keeps the engine running smooth and steady.
The Physics of Block Loading
Think about a truck driving up a hill. If you dump a ton of bricks in the back all at once, the truck slows down. A generator engine does the exact same thing. If you drop a massive load on it instantly, the engine speed drops. This causes a nasty power failure.
Safety codes step in right here. They say you must power up emergency lights and fire alarms first. You usually have ten seconds to get those critical life safety systems running.
Designing the Sequence
Plan your steps carefully. A good sequence shrinks the required generator size.
Step one handles life safety. Fire alarms, water pumps, and exit lights go first.
Step two brings up critical cooling. Think about vital server rooms and main chillers.
Step three tackles your heavy motors. Always start your biggest motor first. Then work your way down to the smallest one.
Step four picks up the rest of the building. This includes standard lights and normal wall outlets.
Step 4: Environmental Derating Factors
Where you put the generator changes everything. A machine rated for 500 kW at sea level will not give you 500 kW in the mountains. The laws of physics step in. We call this power loss generator derating. You must apply generator derating factors to find your true power output.
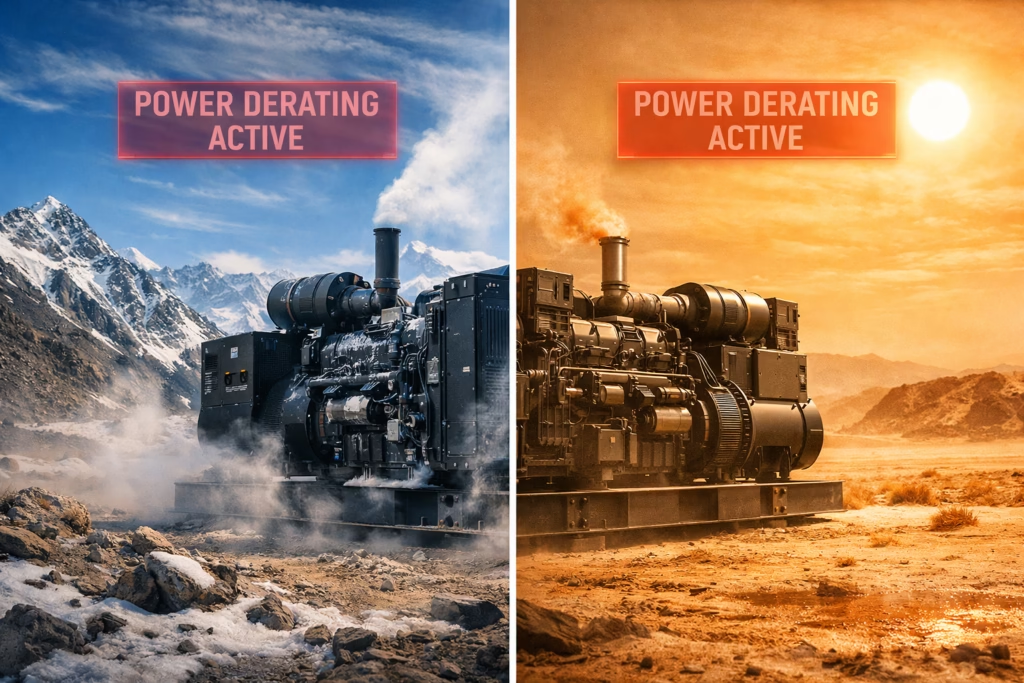
Altitude Deration
Diesel engines breathe air. High altitude means thin air. Thin air holds less oxygen. Less oxygen means the engine burns less fuel.
The engine loses power as you go higher. A good rule of thumb is to cut one to three percent of capacity for every 1,000 feet you climb above sea level. You must check the exact curve from your manufacturer to be safe.
Ambient Temperature Deration
Heat is the enemy of power. High outside heat thins the air even more. It also stops the radiator from cooling the engine block properly.
Most standard generators start losing power when the air hits 104 degrees Fahrenheit or 40 degrees Celsius. You must factor this in if your site gets hot during the summer.
The Compounding Effect
Bad conditions stack up fast. Imagine placing a generator at a high mountain mine during a hot summer. The altitude cuts your power first. The extreme heat cuts it again. Your new generator might only push out sixty percent of its sticker rating. Always do the math for your worst weather days.
Step 5: The Ultimate Generator Sizing Checklist
You now know the rules. It is time to put them to work. Use this generator sizing checklist to gather your facts before you spend any money.
Phase 1: Data Gathering
- Grab your single-line electrical diagrams.
- List every single piece of connected equipment.
- Find out exactly how your large motors start.
- Count all your non-linear loads like battery backups and server racks.
Phase 2: Environment and Site Analysis
- Record the exact altitude of your site.
- Find the highest summer temperature for your location.
- Check the physical space to ensure proper cooling airflow.
Phase 3: Performance Criteria
- Set your absolute limit for voltage drops.
- Set your absolute limit for frequency drops.
- Build a clear sequence of steps to turn power on safely.
Phase 4: Sizing Execution
- Calculate your total steady running power.
- Calculate your massive starting power spike for your worst step.
- Apply your altitude and temperature power cuts.
- Add twenty percent extra capacity so your facility can grow later.
🔌 Generator Sizing & Load Resources
Expert guides, calculators & case studies
Conclusion: Validating with Manufacturer Software
You did the hard math. Pen and paper math builds your gut instinct. You now know exactly what your site needs.
But do not skip the final check. Take your checklist data. Put it into actual maker software. Try tools like Cummins PowerCommand or Caterpillar SpecSizer. They test your math against their real machines.
Bad math costs big money. It ruins your site and breaks your gear. Leave your toughest power problems in the comments below. We will break them down. Use our contact form if you need an honest look at your numbers.