A new garage door opener should make life easier. Press a button. Drive in. Stay dry. Stay safe.
But first, you have to assemble it.
That is where many homeowners get stuck.
The rail pieces may not line up. The chain may hang too low. The belt may twist. The trolley may face the wrong way. The safety sensors may blink and refuse to work. And the manual may feel like it was written for someone who installs openers every day.
If that sounds familiar, you are in the right place.
This guide walks you through Chamberlain garage door opener assembly instructions in plain English. You will learn how to assemble the rail, install the trolley, attach the chain or belt, mount the opener, wire the sensors, set the travel limits, and test the system.
You will also see common problems and simple fixes along the way.
Before we start, one quick note. Chamberlain makes many models. Some are chain drive. Some are belt drive. Some have battery backup. Some connect to Wi-Fi. So use this guide as a helpful companion, not a replacement for your exact model manual.
If your garage door has broken springs, damaged cables, or bent tracks, stop there. Do not try to fix those parts yourself. A garage door can be very heavy. Springs and cables can be dangerous.
Now let’s get your opener assembled the smart way.
Quick Answer: How Do You Assemble a Chamberlain Garage Door Opener?
To assemble a Chamberlain garage door opener, start by checking your model number and laying out all parts. Then assemble the rail, slide the trolley onto the rail, attach the rail to the motor unit, install the chain or belt, mount the header bracket, hang the opener from the ceiling, connect the door arm, install the safety sensors, wire the wall control, set the travel limits, and test the safety reverse system.
That is the short version.
The full process takes more care. One small mistake can cause noise, poor movement, or a door that will not close. So move slowly. Check each step before you move to the next one.
Before You Start: Read This First
A garage door opener is not just another small home gadget. It lifts and lowers a large moving door. That means safety matters.
Do not rush the assembly. Do not skip the door test. Do not guess with wiring. And never adjust garage door springs unless you are trained to do it.
Check Your Chamberlain Model Number
Before you touch a tool, find your model number.
You may see it on the motor unit, the box, the product label, or the owner’s manual. Keep that number nearby. It helps you match your parts and settings.
Chamberlain has several opener types, including:
- Chain drive openers
- Belt drive openers
- Smart garage door openers
- Battery backup models
- Wall mount models
Most ceiling-mounted Chamberlain openers follow a similar setup. Still, small details can change from model to model.
For example, a Chamberlain belt drive assembly may use different belt tension steps than a chain drive model. A smart opener may also need extra setup through an app.
Why the Exact Model Matters
Your model number matters because the parts may look alike but work in different ways.
The rail design may change. The trolley may attach in a different spot. The travel adjustment buttons may be in a different place. The safety sensor wire terminals may also vary.
This guide gives you the big picture. Your manual gives you the exact details.
Use both.
That is the safest path.
Safety Tips Before Assembly
Before you begin, follow these simple safety rules:
- Work with the garage door closed.
- Unplug any old opener before removing it.
- Keep children and pets away from the work area.
- Use a strong ladder.
- Wear safety glasses.
- Do not stand under the motor unit while someone else is lifting it.
- Do not use the opener if the door is damaged.
- Do not repair springs or cables yourself.
Also, get a second person if you can. Some steps are much easier with help. Lifting the rail and motor unit alone can be awkward.
Tools and Parts You’ll Need
A smooth installation starts with a clean setup. Lay out your tools and parts before you begin.
This saves time. It also helps you spot missing hardware early.
Basic Tools
You may need:
- Step ladder
- Adjustable wrench
- Socket wrench
- Screwdrivers
- Pliers
- Tape measure
- Pencil
- Level
- Drill
- Safety glasses
- Work gloves
- Stud finder
You may not need every tool for every model. But it helps to have them close.
Common Chamberlain Opener Parts
Most Chamberlain opener kits include these parts:
- Motor unit
- Rail sections
- Trolley
- Chain or belt
- Header bracket
- Door bracket
- Straight door arm
- Curved door arm
- Safety reversing sensors
- Wall control
- Remote controls
- Emergency release rope
- Hanging brackets
- Hardware bag
Check the parts against your manual before you start.
Do not throw away small clips, pins, or odd-looking hardware. Those small parts often matter later.
Quick Parts Check
Before assembly, ask these questions:
- Do you have all rail sections?
- Do you have the trolley?
- Is the chain or belt included?
- Are both safety sensors in the box?
- Do you have the header bracket?
- Do you have the door bracket?
- Are the remote and wall control included?
- Is the hardware bag complete?
- Does anything look bent or cracked?
If something is missing, stop. Do not try to “make it work” with random parts. Wrong hardware can create a weak connection.
Step 1: Prepare the Garage Door First
Many opener problems are not opener problems at all. They are door problems.
A garage door opener does not fix a bad door. It only moves a door that already works well.
Test the Door Balance
If you are replacing an old opener, disconnect it first. Pull the emergency release so the door moves by hand.
Now lift the garage door halfway.
Let go carefully.
If the door stays in place, it is likely balanced. If it drops fast, rises on its own, or feels very heavy, the door may have a spring problem.
Do not install the opener yet.
A heavy or unbalanced door can strain the motor. It can also damage the rail, trolley, or door arm.
Inspect the Door Hardware
Look at the door before you start.
Check these parts:
- Rollers
- Tracks
- Hinges
- Cables
- Springs
- Brackets
- Door panels
The door should move smoothly by hand. It should not grind, drag, shake, or jam.
If the door sticks by hand, it will likely stick with the opener too.
Fix the door first. Then install the opener.
Why This Step Matters
This is the step many people skip.
They assume the new opener will solve everything. But if the door is the real problem, the opener may act strange from day one.
It may reverse. It may stop halfway. It may sound loud. It may refuse to close.
So take five minutes now. Test the door. You may save hours later.
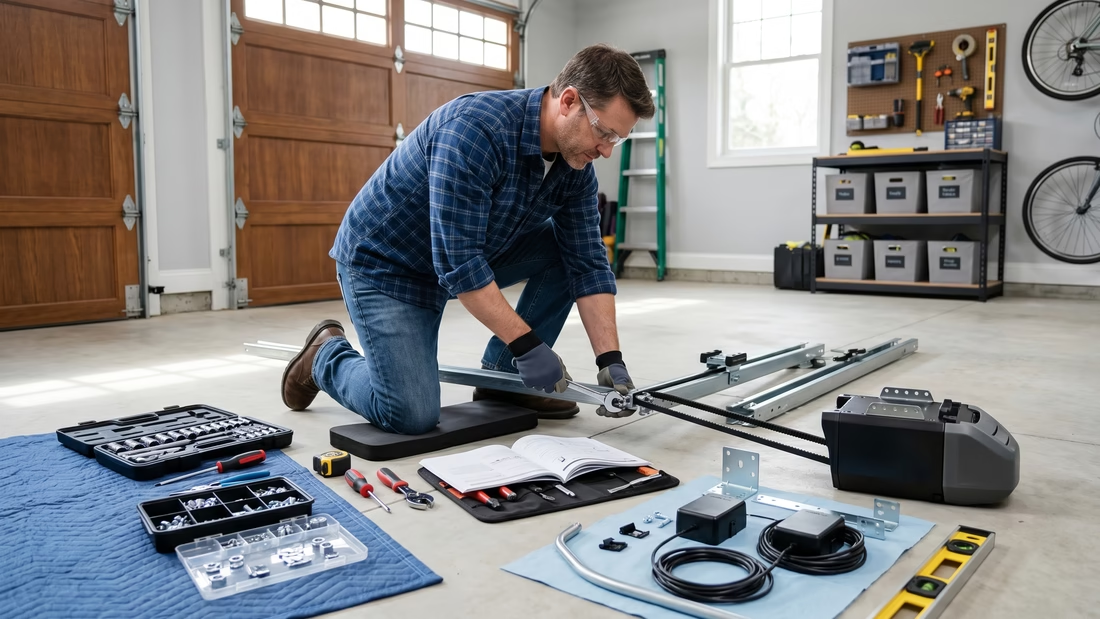
Step 2: Assemble the Rail
The rail guides the trolley. The trolley pulls the door arm. So the rail must be straight and secure.
This is one of the most important parts of Chamberlain opener assembly steps.
Lay Out the Rail Sections
Place the rail sections on a clean floor.
Arrange them in order. Match them to the diagram in your manual. Make sure the ends face the right way.
Do not force the pieces together.
If something does not fit, pause. A section may be upside down or backward.
Connect the Rail Sections
Slide or snap the rail sections together as your model requires.
Work on a flat surface. Push each section in until it seats fully. If your model uses bolts or clips, install them now.
Check the full rail once it is assembled.
It should be straight. There should be no large gaps. The inside track should be clear.
Common Rail Assembly Problems
If the rail will not fit together, check the order. Some sections look almost the same but are not.
If the rail looks crooked, take it apart and reconnect it on a flat surface.
If the hardware does not fit, do not drill new holes. You may be using the wrong bolt or the wrong rail section.
A crooked rail can cause rough travel. It can also make the opener loud.
Step 3: Install the Trolley on the Rail
The trolley is the moving piece that travels along the rail. It connects to the door arm later.
If you install it backward, the opener may not work right.
What the Trolley Does
Think of the trolley as the link between the motor and the door.
The chain or belt moves the trolley. The trolley moves the door arm. The door arm moves the garage door.
That is why trolley direction matters.
Slide the Trolley Into Position
Slide the trolley onto the rail as shown in your manual.
Make sure the emergency release section faces the correct direction. The release rope should hang down where you can reach it later.
Do not lock the trolley too early unless your manual tells you to.
The trolley should move along the rail without catching.
Common Trolley Mistakes
Watch out for these mistakes:
- Trolley installed backward
- Emergency release facing the wrong way
- Trolley locked too soon
- Trolley placed too close to the motor unit
- Trolley not seated fully on the rail
If something feels wrong, fix it now. It is much easier before the opener is hanging from the ceiling.
Step 4: Attach the Rail to the Motor Unit
Now you will connect the rail to the opener motor.
The motor unit is the main box. It holds the drive gear, lights, controls, and power parts.
Position the Motor Unit
Place the motor unit on cardboard or a soft surface. This helps protect the cover.
Line up the rail with the front of the motor unit. The drive gear or sprocket should match the rail path.
Keep the unit steady while you work.
Secure the Rail to the Opener
Attach the rail with the provided hardware.
Tighten the bolts evenly. Do not overtighten them. You want a firm hold, not cracked plastic or stripped threads.
Once attached, check the alignment.
The rail should point straight out from the motor unit. The trolley should still move freely.
What to Check Before Moving On
Before you install the chain or belt, check this list:
- Rail is attached firmly.
- Rail is straight.
- Trolley moves smoothly.
- Motor unit is stable.
- Bolts are snug.
- No parts are rubbing.
- Chain or belt path is clear.
This small check can prevent big headaches later.
Step 5: Install the Chain or Belt
Now comes the drive system.
Some Chamberlain openers use a chain. Others use a belt. The idea is the same. The motor turns the drive system. The drive system moves the trolley.
Chain Drive vs Belt Drive
A chain drive opener uses a metal chain. It is strong and common. It may make more noise than a belt.
A belt drive opener uses a rubber-style belt. It is often quieter. Many people like it for garages attached to the home.
Both systems need correct routing and tension.
Route the Chain or Belt
Place the chain or belt around the motor sprocket or pulley as your manual shows.
Route it along the rail. Connect it to the trolley. Make sure it sits in the proper track.
The chain should not be twisted. The belt should lie flat.
If it twists during setup, stop and correct it. Do not run the opener with a twisted belt.
Set the Correct Tension
The chain or belt should not sag too much. It should also not be too tight.
A loose chain can slap the rail. It can also skip or jerk.
A tight chain or belt can strain the motor and gear parts.
Adjust the tension slowly. Make small turns. Then check again.
This is a common step in Chamberlain garage door opener troubleshooting. Many noise issues start here.
Common Chain or Belt Problems
If the chain hangs too low, adjust the tension nut according to your model.
If the belt twists, disconnect and reroute it.
If the chain jumps off the sprocket, check alignment. Also check tension. Do not just tighten it more and hope for the best.
If the system feels rough by hand, something is out of place.
Step 6: Install the Header Bracket
The header bracket holds the front end of the opener rail above the garage door.
This bracket must be strong. It carries force each time the door opens and closes.
Find the Center of the Door
Measure the width of the garage door.
Mark the center above the door. Use a pencil. This mark helps keep the opener aligned.
A centered opener pulls the door evenly. An off-center opener can cause stress and noise.
Choose the Right Height
The header bracket usually goes above the highest point of door travel.
To find that point, open the door by hand and watch the top edge. Your manual will explain the needed height for your model and door type.
Do not mount the bracket too low.
If it sits too low, the rail angle may be wrong. The door may bind or hit the rail.
Secure the Header Bracket
Mount the bracket into solid framing.
Do not attach it only to drywall. Drywall cannot hold this load.
Use the proper screws or bolts from your kit. Tighten them firmly. The bracket should not move.
If you cannot find strong framing, stop and get help. This is not a place to guess.
Step 7: Attach the Rail to the Header Bracket
Now the rail goes up.
This step is easier with two people. One person can support the rail. The other can line up the pin and fastener.
Lift the Rail Into Place
Raise the front end of the rail to the header bracket.
Rest the motor unit on a ladder for support. Make sure the ladder is steady.
Do not let the motor unit hang from the rail unsupported.
Insert the Pin and Fastener
Line up the rail end with the header bracket.
Insert the clevis pin or the correct connector from your kit. Secure it with the ring fastener or clip.
Check that the rail can pivot slightly. That small movement helps during final alignment.
Quick Safety Check
Before you continue, check the bracket.
It should stay firm. The pin should be secure. The rail should be centered on your mark.
If anything shifts, fix it now.
Step 8: Hang the Motor Unit From the Ceiling
The motor unit must hang from solid ceiling framing.
This is another step where strength matters.
Find Ceiling Joists
Use a stud finder to locate joists. You can also look for existing framing if the garage ceiling is open.
Do not mount the opener to drywall only.
The opener vibrates during use. Weak support can loosen over time.
Install Hanging Brackets
Use the hanging straps or angle brackets from your kit. Some garages may need extra angle iron for a stronger setup.
Hold the motor unit level. The rail should line up with the center of the door.
Attach the brackets to the ceiling framing first. Then attach them to the motor unit.
Tighten all bolts.
Check Rail Alignment
Step back and look at the opener.
The rail should run straight from the header bracket to the motor unit. The motor should not lean left or right.
Poor alignment can cause:
- Shaking
- Binding
- Loud operation
- Uneven door movement
- Extra wear on parts
Make small changes now. A level opener runs better.
Step 9: Attach the Door Bracket and Door Arm
Now you connect the opener to the garage door.
This is where the motor’s pull reaches the door.
Install the Door Bracket
Mount the door bracket near the top center of the garage door.
For some doors, you may need reinforcement. Lightweight doors can flex when the opener pulls them. If the top section bends, stop and add the proper support.
Keep the bracket centered.
Use the correct hardware. Tighten it well.
Connect the Door Arms
Most Chamberlain openers use a straight arm and a curved arm.
The straight arm often connects to the trolley. The curved arm often connects to the door bracket.
The two arms overlap. You bolt them together through matching holes.
The angle matters. If the angle is too steep, the opener may pull poorly. If the arm is too short or too long, the door may not travel smoothly.
Use your model instructions for the correct hole choice.
Common Door Arm Problems
Here are signs something is wrong:
- Door flexes when moving
- Arm hits the rail
- Arm angle looks extreme
- Hardware loosens
- Door jerks at the start
- Trolley does not connect cleanly
If you see these signs, do not run full cycles yet. Adjust the connection first.
Step 10: Install the Safety Reversing Sensors
Safety sensors are not optional.
They sit near the bottom of the door tracks. They send an invisible beam across the door opening. If something blocks the beam, the door should not close.
This protects people, pets, cars, bikes, and storage items.
Mount the Sensors
Install one sensor on each side of the garage door.
Place them low near the floor, as your manual shows. Point them directly at each other.
Keep the brackets firm. If a sensor shakes or moves, the opener may not close.
Wire the Sensors
Run the sensor wires neatly to the motor unit.
Use safe staples made for low-voltage wire. Do not crush the wire. Do not pierce it with a staple.
Connect the wires to the correct terminals on the motor unit.
If the wires are loose or reversed, the sensors may not work.
Align the Sensors
After power is connected, the sensor lights should help you align them.
In most cases, steady lights mean good alignment. Blinking lights often mean trouble.
If your Chamberlain garage door opener won’t close after installation, check the sensors first. This is one of the most common causes.
Sensor Troubleshooting
If the door will not close, clean the lenses.
If the lights blink, move the sensors until they face each other.
If one sensor has no light, check the wire connection.
If the door closes only when you hold the wall button, the sensors may be misaligned or wired wrong.
Step 11: Install the Wall Control
The wall control lets you open and close the door from inside the garage.
Place it in a smart spot.
Choose a Good Location
Mount the wall control where adults can reach it easily.
You should be able to see the garage door while using it.
Keep it out of reach of small children.
Do not place it behind shelves, tools, or storage boxes.
Connect the Wall Control Wires
Run the wall control wire from the motor unit to the wall control.
Secure it neatly. Again, do not crush or pierce the wire.
Connect the wires to the correct terminals.
Mount the control to the wall.
Common Wall Control Problems
If the wall button does not work, check the wires first.
Make sure they are not loose. Make sure they are connected to the right place. Also check if lock mode is turned on, if your wall control has that feature.
A tiny wiring mistake can make the opener seem broken.
Step 12: Connect Power and Set Travel Limits
Now the opener starts to come alive.
But do not press buttons at random. You still need to set the travel limits.
Travel limits tell the opener where the door should stop when fully open or fully closed.
Plug In the Opener
Plug the opener into a grounded outlet.
Do not use an extension cord for normal operation.
Watch the opener lights. Listen for odd sounds. A quick click or light flash may be normal. Grinding, burning smells, or sparks are not.
If something smells hot or looks unsafe, unplug the opener.
Set the Up and Down Travel
Newer Chamberlain openers often use buttons on the motor unit to set travel limits.
Follow your model’s process.
You will usually move the door to the full open point. Then you save that setting. Next, you move the door to the full closed point and save that setting.
Do not set the down travel too far.
If the opener pushes the door hard into the floor, it may reverse. It may also strain the door and opener.
Adjust Force Settings
Force settings control how much push or pull the opener uses.
Some models set this on their own during programming. Others may allow adjustment.
Too little force can stop the door early. Too much force can be unsafe.
The door should move smoothly. It should not slam, grind, or fight the opener.
Step 13: Test the Garage Door Opener
Testing is not a bonus step. It is part of the installation.
A garage door opener should not just work. It should work safely.
Run a Full Open and Close Cycle
Press the wall control and watch the door.
The door should open smoothly. The rail should stay steady. The chain or belt should move cleanly.
Now close the door.
Watch the sensors. Listen for scraping or banging. Look for shaking.
If the door stops, reverses, or jerks, pause and inspect the system.
Test the Safety Reverse System
Place a solid object in the door path.
Close the door.
When the door touches the object, it should reverse.
If it does not reverse, stop using the opener until you fix the issue.
This test matters. Do not skip it.
Test the Photo Eye Sensors
Start closing the door.
Break the sensor beam with an object.
The door should stop and reverse.
If it keeps closing, the sensors are not working as they should. Check alignment and wiring.
Step 14: Program the Remote and Keypad
Now you can set up the easy parts.
The remote lets you open the door from your car. The keypad lets you open it from outside with a code.
Program the Remote Control
Find the learn button on the motor unit.
Press it as your manual says. Then press the button on your remote.
The opener may click or flash its light to show the remote is paired.
Test the remote from inside the garage first.
Program the Wireless Keypad
Choose a code that you can remember.
Avoid simple codes like 1234 or your house number.
Follow the keypad setup steps for your model.
Then test it from outside the garage.
Set Up Smart Features
If your opener has smart features, you may be able to connect it to an app.
Make sure your Wi-Fi signal reaches the garage. Weak signal can cause setup problems.
Follow the app prompts. Test the open and close feature once setup is done.
This step is often part of a modern Chamberlain garage door opener setup.
Chamberlain Garage Door Opener Assembly Problems and Quick Fixes
Even careful DIYers run into problems. That is normal.
Here are the most common issues and what to do next.
Problem 1: The Rail Will Not Fit Together
The rail sections may be in the wrong order. One piece may be upside down. A shipping clip may still be attached.
Lay the rail pieces on the floor again. Match them with the diagram. Check each end before connecting.
Do not hammer parts together. If they need that much force, something is wrong.
Problem 2: The Chain or Belt Is Too Loose
A loose chain or belt may sag, slap, or jump.
Check the path first. Make sure it is not twisted. Make sure it is seated on the sprocket or pulley.
Then adjust the tension slowly.
Do not overtighten it. Too tight can cause damage.
Problem 3: The Door Opens but Will Not Close
This is often a sensor issue.
Check for boxes, tools, leaves, or dirt blocking the sensor beam.
Clean both lenses. Align the sensors. Check the wires at the motor unit.
If the sensor lights keep blinking, alignment is still off.
Problem 4: The Opener Runs but the Door Does Not Move
The trolley may be disconnected. The emergency release may be pulled. The door arm may not be attached.
Check the trolley first.
Reconnect it if needed. Then inspect the door arm connection.
If the motor runs but nothing moves, do not keep pressing the button. You may damage the unit.
Problem 5: The Door Reverses Before It Fully Closes
The down travel may be set too far. The opener may think the door hit something.
The door may also be binding in the tracks.
Test the door by hand. If it moves smoothly, adjust the travel settings.
If it sticks by hand, fix the door issue first.
Problem 6: The Opener Is Loud or Shaky
Check the hanging brackets. Loose brackets can shake.
Check rail alignment. A crooked rail can make the opener noisy.
Check chain tension. A loose chain can slap the rail.
Also inspect the door rollers. Old rollers can make even a new opener sound bad.
Chamberlain Garage Door Opener Assembly Checklist
Use this checklist before you call the job done.
Pre-Assembly Checklist
- Door moves smoothly by hand.
- Door stays halfway open when tested.
- Springs and cables look safe.
- All parts are included.
- Correct manual is nearby.
- Tools are ready.
- Work area is clear.
- Power is off during wiring.
Assembly Checklist
- Rail sections are connected.
- Trolley is installed in the right direction.
- Rail is attached to the motor unit.
- Chain or belt is routed correctly.
- Chain or belt tension looks right.
- Header bracket is mounted into solid framing.
- Rail is attached to the header bracket.
- Motor unit is hung from ceiling framing.
- Opener is level and centered.
- Door bracket is secure.
- Door arm is connected.
- Sensors are mounted and aligned.
- Wall control is wired.
- Travel limits are set.
- Safety reverse test works.
- Remote and keypad are programmed.
If you can check every item, you are in good shape.
When to Call a Professional
DIY installation can save money. It can also feel great.
But some jobs are not worth the risk.
Call a garage door technician if:
- The door feels very heavy.
- The door drops when half open.
- A spring is broken.
- A cable is frayed or loose.
- The door is off track.
- The opener smokes or sparks.
- The header bracket has no solid support.
- The door does not reverse during safety testing.
- The opener runs but the door does not move.
- You feel unsure about any step.
There is no shame in calling for help. A safe install is the real goal.
Maintenance Tips After Assembly
Once your opener works, keep it that way.
A little maintenance can prevent noise, strain, and surprise breakdowns.
Monthly Checks
Once a month, watch the opener run.
Look for shaking. Listen for new sounds. Check that the door opens and closes smoothly.
Test the safety sensors. Make sure the door reverses when the beam is blocked.
Every Few Months
Check the bolts and brackets. Tighten anything loose.
Clean the sensor lenses.
Check chain or belt tension.
Lubricate garage door parts if your door maker recommends it. Do not spray random lubricant into the opener motor.
Once a Year
Test the full system.
Check the remote batteries. Test the keypad. If your opener has battery backup, test that too.
Also test the door by hand once in a while. A good opener still depends on a good door.
FAQs About Chamberlain Garage Door Opener Assembly Instructions
Can I assemble a Chamberlain garage door opener myself?
Yes, many homeowners can assemble and install one with basic tools. Take your time. Follow your model manual. Do not adjust springs or repair cables yourself.
How long does it take to assemble a Chamberlain garage door opener?
Most DIY installs take a few hours. It may take longer if this is your first opener or if your garage needs extra support.
Why won’t my Chamberlain garage door opener close?
The most common cause is sensor trouble. Check for blocked, dirty, loose, or misaligned sensors. Also check the sensor wires.
Why is my Chamberlain opener chain hanging loose?
The chain may need tension adjustment. It may also be routed wrong. Check the chain path before you tighten anything.
Do I need Wi-Fi to use a Chamberlain garage door opener?
No. The basic open and close function does not need Wi-Fi. Wi-Fi is only needed for smart app features.
How do I align Chamberlain garage door sensors?
Mount both sensors at the same height. Point them at each other. Adjust them until the indicator lights stay steady. Then test the door.
Why does my opener reverse after touching the floor?
The down travel may be set too far. The opener may think it hit an object. Adjust the travel setting and test again.
What should I do if the opener runs but the door does not move?
Check the trolley and emergency release first. The trolley may be disconnected. Also check the door arm connection.
Need Help Installing Your Chamberlain Garage Door Opener?
A Chamberlain opener can be a great upgrade. But it must be assembled and tested the right way.
If you are stuck halfway through the job, do not force parts together. Do not keep pressing the opener button and hoping it works. That can damage the opener or the door.
Step back. Check the rail. Check the trolley. Check the chain or belt. Check the sensors. Most problems come from one small missed detail.
And if the door feels heavy, the springs look damaged, or the opener fails the safety test, call a pro.
Your garage door should open smoothly, close safely, and make daily life easier. With the right setup, your Chamberlain garage door opener can do exactly that.