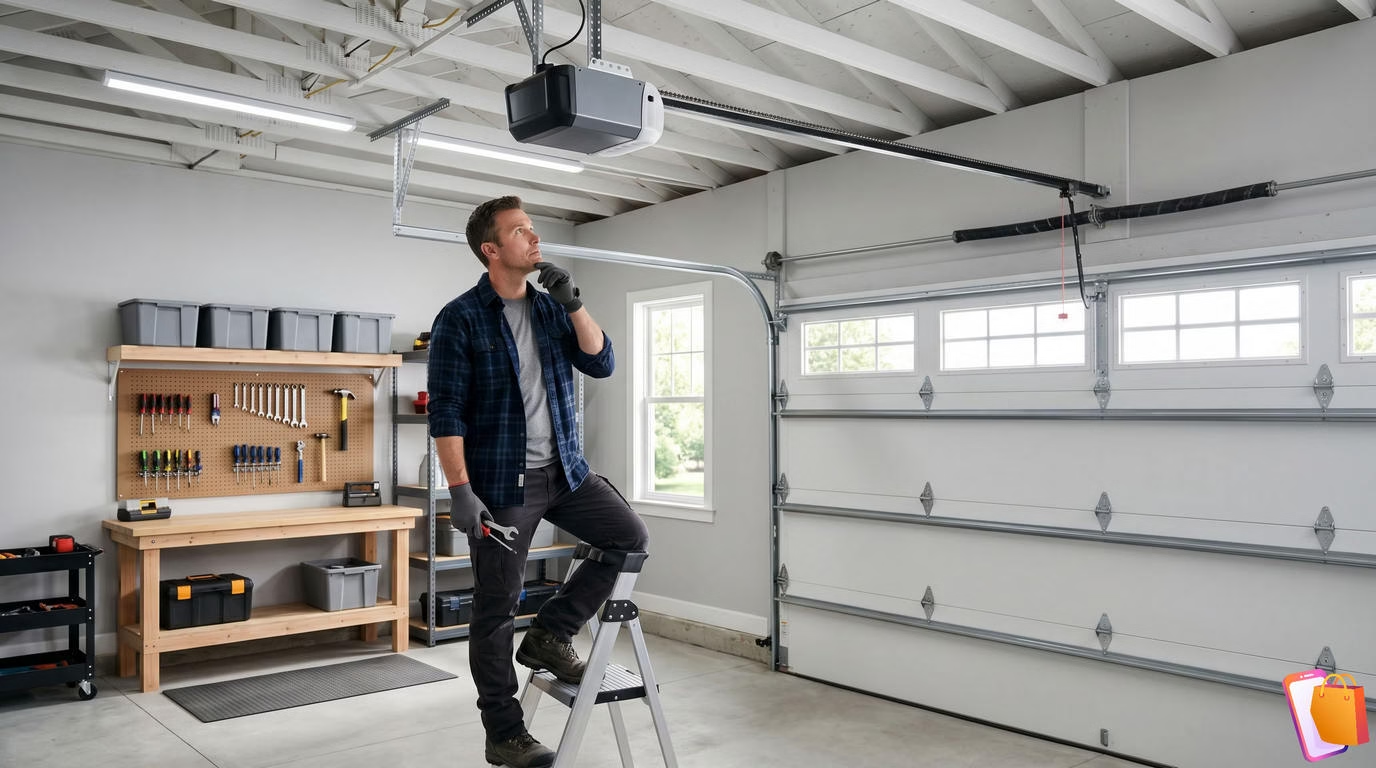
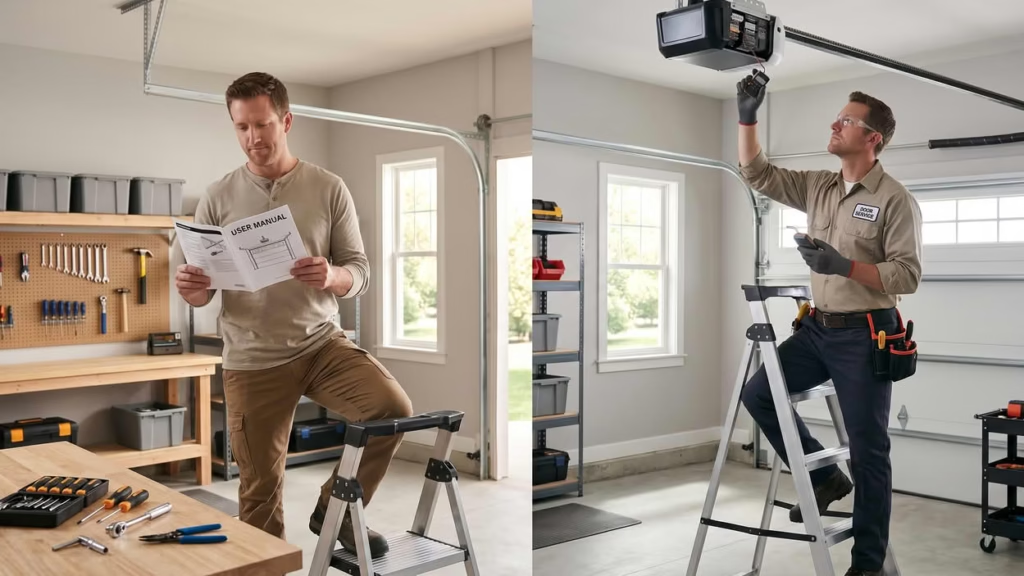
A LiftMaster garage door opener installation usually includes mounting the opener, connecting the rail and motor, setting up the safety sensors, adjusting the travel limits, and testing the door. It may also include programming remotes, wall controls, keypads, and smart features like myQ. Most homeowners can understand the basic process, but not everyone should try the full installation alone.
If your garage door is balanced, modern, and in good shape, a skilled DIYer may be able to install a LiftMaster garage door opener with the right tools and the official manual. But if the door feels heavy, jerks while moving, has broken parts, or uses old hardware, it is safer to call a trained garage door technician.
The main thing to know is this: the opener does not lift the full weight of the door by itself. The garage door system must already work well before you add a new opener. If the door has spring, track, roller, or balance problems, a new opener will not fix them. It may even make the problem worse.
For most people, the safest choice is to use this guide to understand the process, plan the budget, compare DIY vs professional installation, and avoid common mistakes. That way, you can decide if this is a weekend project or a job for a pro.
What Is Included in a LiftMaster Garage Door Opener Installation?
A LiftMaster garage door opener installation is more than hanging a motor from the ceiling. A complete setup includes the opener unit, rail system, trolley, wall control, safety sensors, remote controls, and door arm. Some models may also include a battery backup, Wi-Fi setup, keypad, or smart garage door control through the myQ app.
Main Parts Used During Installation
Most LiftMaster opener kits include the core parts needed to operate the door. These often include the motor unit, rail, chain or belt, trolley, door bracket, header bracket, safety sensors, remote, and wall button. Some parts vary by model, so the box contents may not look the same for every opener.
The motor unit powers the opener. The rail guides the trolley. The trolley moves the door arm. The safety sensors help stop the door if something blocks the path. Each part has a simple job, but all parts must work together for smooth and safe operation.
Basic Installation Tasks
A standard installation usually starts with checking the garage door. The door should move smoothly by hand before the opener is installed. If it sticks, drops fast, or feels too heavy, the opener should not be installed until the door is fixed.
After that, the installer sets up the rail and attaches it to the motor unit. Then the opener gets mounted above the garage door area. The door arm connects the opener to the garage door. Safety sensors are placed near the bottom of the door tracks. Then the wall control and power source are connected.
The last steps include setting the open and close limits, testing the safety reverse system, programming remotes, and checking the full movement of the door. If the model supports smart control, the installer may also connect the opener to Wi-Fi and set up the myQ app.
What May Not Be Included
A garage door opener installation does not always include repairs to the garage door itself. This is important. If the springs, cables, rollers, hinges, or tracks need work, that may count as a separate repair.
It may also not include extra accessories. For example, a wireless keypad, extra remote, battery backup, extension rail, or surge protector may cost more. Some tall garage doors also need an extension kit, especially if the door is higher than the standard size.
Why the Door Condition Matters
The opener works best when the garage door is already in good shape. A weak or damaged door can strain the motor. It can also make the opener noisy, slow, or unsafe.
Before installing a LiftMaster garage door opener, the door should open and close smoothly by hand. It should not slam shut. It should not feel stuck. It should not lean to one side. If any of these things happen, fix the door first. Then install the opener.
Can You Install a LiftMaster Garage Door Opener Yourself?
Yes, some homeowners can install a LiftMaster garage door opener themselves. But it depends on your skill level, tools, door condition, and comfort with overhead work. This is not the same as building a small shelf or changing a light bulb. The opener must be mounted, aligned, adjusted, and tested with care.
When DIY Installation May Make Sense
DIY installation may make sense if your garage door is already balanced and works well by hand. It also helps if you have basic tools, a sturdy ladder, and someone to help you lift and hold parts in place.
You should also feel comfortable reading the LiftMaster installation manual. Each model can have small differences. A belt drive opener may not install the same way as a chain drive opener. A wall mount LiftMaster opener is also different from a ceiling mount model.
DIY may be a good choice if you are replacing an older opener with a similar type. In that case, some brackets or wiring paths may already exist. Still, you should not reuse old parts unless the manual says they are safe to use.
When You Should Not Install It Yourself
You should avoid DIY installation if the garage door feels too heavy, shakes, sticks, or does not stay partly open when moved by hand. These signs may point to a balance or spring issue. Garage door springs can be dangerous, so do not adjust or repair them yourself unless you are trained.
You should also call a pro if your ceiling has unusual framing, the opener needs new wiring, the door is oversized, or the installation area feels unsafe. The same applies if you have a one-piece door, a very old door, or damaged tracks.
A professional installer can spot problems that a homeowner may miss. They can also adjust the opener settings, test the safety sensors, and make sure the door reverses when it should.
DIY vs Professional Installation
DIY can save money upfront. It also gives you control over the schedule. But it can take several hours, especially if this is your first time. You may also need to buy extra tools or parts.
Professional installation costs more, but it can save time and reduce risk. It is often the better choice if you want a clean setup, safe testing, and fewer headaches. It may also help protect the opener from damage caused by poor alignment or wrong setup.
A Simple Rule to Follow
Use this simple rule: if the door works smoothly by hand, the installation may be possible for a careful DIYer. If the door has any movement problem, fix that first or call a garage door technician.
A LiftMaster opener can make your garage more secure and easy to use. But it should never be used to force a bad door to work. The opener is only one part of the system. The door itself must be safe, balanced, and ready.
Tools You May Need
Before you start a LiftMaster garage door opener installation, gather the right tools.
This can save time and keep the job from turning into a long, frustrating project.
You do not need a full workshop, but you do need a few basic tools and a safe setup.
tape level socket drill pliers
stud finder · wire stripper · clamps
The exact list can change based on your LiftMaster model and garage layout.
As an Amazon Associate, we earn from qualifying purchases.
Most homeowners will need a ladder, tape measure, level, socket wrench, screwdriver, drill, pliers, pencil, and safety glasses. You may also need a stud finder, wire stripper, adjustable wrench, and clamps. The exact list can change based on your LiftMaster model and garage layout.
Basic Tools for the Job
A sturdy ladder is one of the most important tools. The opener sits above your head, so you need a safe way to reach the ceiling. Do not stand on boxes, chairs, or unstable surfaces. That may seem faster, but it is not worth the risk.
You will also need a tape measure and level. These help you place the rail and opener in the right position. A small mistake in alignment can lead to noise, shaking, or poor door movement. Clean alignment helps the opener run better.
A socket wrench or wrench set helps tighten bolts and brackets. A screwdriver is useful for smaller parts, controls, and covers. A drill may be needed for mounting brackets, depending on your garage frame and the model you install.
Safety Gear You Should Use
Wear safety glasses when drilling, mounting parts, or working near the ceiling. Dust, metal bits, or small parts can fall while you work. Gloves can also help protect your hands from sharp edges on brackets, rails, or door hardware.
You should also use clamps to hold the garage door in place when needed. This helps prevent unwanted movement during setup. Always follow the LiftMaster installation manual for your specific model. Do not guess if a step seems unclear.
If any part of the job involves springs, cables, or major door repairs, stop. These parts can be dangerous. A garage door spring repair is not a normal DIY task. It is better to call a trained garage door technician for that work.
Parts and Accessories to Check
Before you install the opener, check the box and make sure all parts are there. Look for the motor unit, rail, trolley, belt or chain, brackets, door arm, wall control, remote controls, and safety sensors. Some kits may include extra accessories, while others may not.
You may need extra parts if your garage door is taller than standard. For example, many 8-foot garage doors need an extension kit. Some setups may also need angle iron or extra hanging brackets to support the motor unit.
If you want smart garage door control, check if your model supports Wi-Fi or the myQ app. Some LiftMaster garage door openers include smart features. Others may need extra setup or accessories.
A Quick Prep Tip
Lay out all parts before you begin. Match each part with the manual. This simple step can prevent confusion later. It also helps you spot missing parts before the opener is half installed.
If something is missing, do not force a workaround. The opener needs the right parts to run safely. Using the wrong bracket, bolt, or rail piece can create problems later.
Basic Installation Steps
A LiftMaster garage door opener installation follows a clear process, but each model can be a little different. Use this section as a simple overview, not a replacement for the official manual. The manual should always be your main guide.
The basic process includes checking the door, building the rail, mounting the opener, connecting the door arm, placing the safety sensors, setting the limits, and testing the system. Each step matters. Skipping one can lead to poor performance or safety issues.
Step 1: Check the Garage Door First
Start by testing the garage door by hand. Pull the emergency release if an old opener is attached, then lift and lower the door manually. The door should move smoothly. It should not feel too heavy, stick, slam down, or drift open.
This check is important because the opener should not force a bad door to work. If the garage door is unbalanced, the motor may strain. That can shorten the life of the opener and make the system unsafe.
If the door does not pass this test, pause the installation. Fix the door issue first. In many cases, this means calling a professional, especially if springs, cables, or tracks need repair.
Step 2: Assemble the Rail and Opener
Next, assemble the rail system based on the LiftMaster manual. The rail guides the trolley, which moves the door arm. Some models use a belt drive. Others use a chain drive. The setup can vary, so follow your exact model instructions.
Attach the rail to the motor unit. Then install the trolley and drive system as directed. Do not overtighten parts unless the manual says to. Too much tension can cause wear, noise, or rough movement.
This is also a good time to check the opener type. A LiftMaster belt drive opener is often quieter. A chain drive opener may be more budget-friendly and strong. A wall mount opener has a different setup and may not use the same ceiling rail system.
Step 3: Mount the Header Bracket and Opener
The header bracket attaches above the garage door. It supports the front end of the rail. Placement matters here. If the bracket sits too high, too low, or off-center, the opener may pull the door at a bad angle.
After that, the motor unit is lifted and secured to the ceiling supports. This step is much easier with two people. One person can hold the opener while the other checks the position and fastens the supports.
Make sure the opener is level and firmly mounted. A loose opener can shake, rattle, or shift over time. If your ceiling framing is unusual, you may need extra support hardware.
Step 4: Connect the Door Arm
The door arm links the trolley to the garage door. This part transfers motion from the opener to the door. It should connect at the right angle and position, based on your manual.
Do not drill into weak or damaged door panels. If the top section of the garage door bends or flexes, it may need a reinforcement bracket. This is common on some lightweight doors.
A poor connection can damage the door over time. It can also make the opener pull unevenly. If the door looks weak near the bracket area, get advice before moving forward.
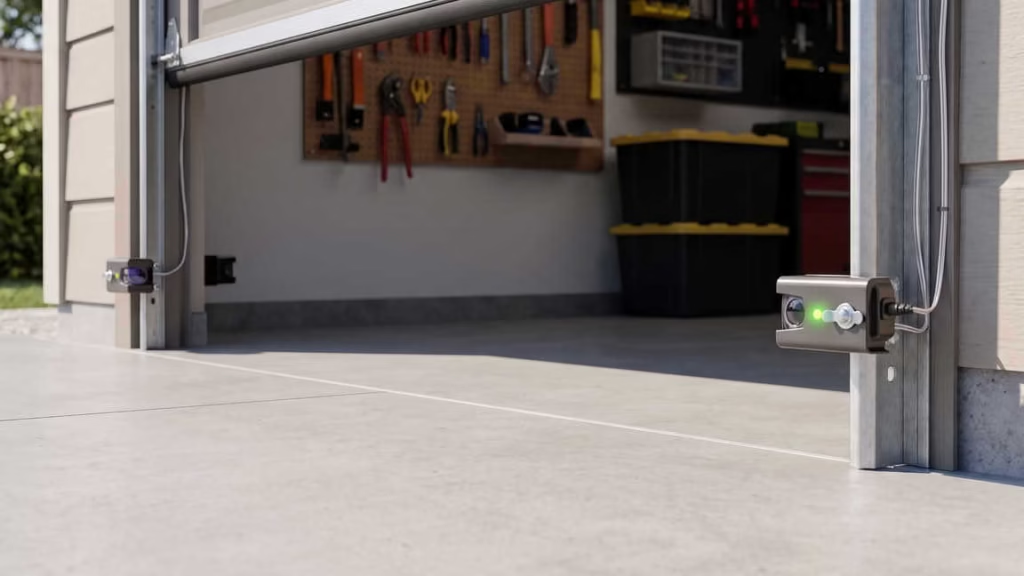
Step 5: Install the Safety Sensors
Safety sensors sit near the bottom of the garage door opening. They send an invisible beam across the doorway. If something blocks the beam, the door should not close.
Place the sensors at the height listed in your manual. They must face each other and stay aligned. If they are crooked, blocked, or loose, the opener may refuse to close. This is one of the most common garage door opener installation problems.
Keep the sensor area clean. Dust, boxes, tools, or sunlight can sometimes affect performance. After setup, test the sensors before using the opener daily.
Step 6: Set Limits and Test the Door
Once the opener is mounted and connected, set the open and close limits. These settings tell the opener where the door should stop. If the limits are wrong, the door may stop too soon or push too hard against the floor.
You should also test the safety reverse system. The door should reverse if it meets resistance or if the sensor beam is blocked. This is not a step to rush. It protects people, pets, vehicles, and belongings.
After testing, program the remote, keypad, wall control, and myQ app if your model supports it. Open and close the door several times. Listen for scraping, grinding, jerking, or loud shaking. If anything feels wrong, stop and inspect the setup.
How Much Does LiftMaster Garage Door Opener Installation Cost?
The cost to install a LiftMaster garage door opener can vary. It depends on the opener model, door size, labor rates, accessories, and whether the garage door needs repair first. A basic installation usually costs less than a setup with smart features, battery backup, or extra parts.
If you hire a professional, the total price may include both the opener and labor. If you install it yourself, you may only pay for the opener, tools, and any extra parts. DIY can cost less, but it may take more time and effort.
Typical Cost Factors
The opener model is one of the biggest cost factors. A basic chain drive LiftMaster opener often costs less than a belt drive or wall mount model. Smart features, battery backup, and quieter motors can raise the price.
Door size also matters. A standard 7-foot garage door is often easier to handle. An 8-foot or taller door may need an extension kit. A heavy wood door or oversized door may need a stronger opener.
Labor can also change the total cost. Some installers charge a flat fee. Others may charge more if the job takes longer, needs extra brackets, or includes old opener removal.
DIY Installation Costs
DIY installation may seem cheaper at first. You buy the opener and install it yourself. If you already have the tools, this can be a budget-friendly choice.
But DIY may still come with extra costs. You may need a ladder, drill bits, angle iron, extension kit, surge protector, or new wall control wiring. If you make a mistake, you may also need to buy replacement parts.
The biggest cost with DIY is time. A first-time installation can take several hours. It may take longer if the ceiling setup is tricky or if the old opener must be removed first.
Professional Installation Costs
Professional installation usually costs more upfront, but it can save stress. A technician can mount the opener, align the rail, set the limits, test the sensors, and check the door movement.
A pro can also spot problems before they damage the opener. For example, they may notice a weak top door panel, worn rollers, loose hinges, or a balance issue. These small problems can turn into bigger repairs if ignored.
If you are not confident with overhead mounting, wiring, or safety testing, professional installation may be worth the extra cost. It gives you a cleaner setup and more peace of mind.
Extra Costs to Keep in Mind
Some costs may not be included in a basic installation. These can include old opener removal, extra remotes, wireless keypad setup, battery backup, Wi-Fi setup, extension rails, or door reinforcement brackets.
Garage door repairs are also separate in many cases. If the door needs new rollers, spring service, track repair, or panel reinforcement, that can raise the total bill.
Before hiring anyone, ask what the price includes. Ask if they will test the safety sensors, program remotes, connect smart features, and haul away the old opener. Clear questions can help you avoid surprise costs.
Is Professional Installation Worth It?
Professional installation is worth it if your door is old, heavy, damaged, or hard to move by hand. It is also smart if you bought a higher-end LiftMaster garage door opener and want it set up correctly.
DIY can be a good choice for simple replacements. But if the job feels above your comfort level, do not force it. A safe installation matters more than saving a little money.
DIY vs Professional Installation
DIY and professional installation can both work. The better choice depends on your door, your tools, your time, and your comfort level. A LiftMaster garage door opener is not the hardest home project, but it is not risk-free either.
If your garage door moves smoothly by hand, DIY may be possible. If the door sticks, feels heavy, or has worn parts, professional help is the safer path. The opener should work with the door, not fight against it.
When DIY Installation Is a Good Fit
DIY installation may be a good fit if you already have basic tools and some home repair experience. You should feel comfortable using a ladder, drill, wrench, level, and measuring tape. You should also have enough patience to follow the manual step by step.
It also helps if you are replacing an old garage door opener with a similar model. For example, swapping one ceiling-mounted opener for another may be easier than installing a new system from scratch.
Still, do not rush. A simple LiftMaster opener installation can take several hours for a first-time DIYer. Plan for extra time. Clear the garage floor. Keep pets and kids away from the work area.
When Professional Installation Makes More Sense
Professional installation makes more sense if your garage door has problems. These may include broken rollers, bent tracks, loose hinges, damaged panels, or a door that will not stay open by itself.
A garage door that feels too heavy may have a spring or balance issue. Do not try to fix that as part of a DIY opener job. Garage door springs hold a lot of force. They can cause serious injury if handled the wrong way.
A pro can also help if your setup is not standard. This includes tall doors, heavy wood doors, low ceilings, weak ceiling supports, or wall mount LiftMaster openers. These jobs often need more care and the right parts.
Pros and Cons of DIY Installation
DIY installation can save money. It can also feel rewarding. You get to learn how the opener works, and you can set it up on your own schedule.
But DIY also comes with trade-offs. You may spend more time than expected. You may need extra tools or parts. You may also make small alignment mistakes that cause noise, shaking, or poor door movement.
The biggest risk is safety. If you skip sensor testing or set the travel limits wrong, the door may not reverse when it should. That can put people, pets, cars, and stored items at risk.
Pros and Cons of Professional Installation
Professional installation costs more, but it gives you more peace of mind. A trained installer can mount the opener, align the rail, connect the arm, test the sensors, and adjust the settings.
A pro may also notice door issues before they become expensive. For example, worn rollers can make the opener work harder. A weak top panel can bend under pressure. Loose tracks can cause rough movement.
The downside is cost. You also need to schedule the job. But for many homeowners, the saved time and safer setup are worth it.
Which Option Should You Choose?
Choose DIY if the door works well, the setup is simple, and you feel confident with tools. Choose professional installation if the door has problems, the setup is complex, or you feel unsure at any point.
Here is the simplest way to decide:
If you are only installing the opener, DIY may be fine. If you also need to fix the garage door, call a pro.
That one rule can save you time, money, and stress.
Common Mistakes to Avoid
A LiftMaster garage door opener installation can go wrong in small ways. The opener may still run, but it may be noisy, rough, or unsafe. Most problems come from poor alignment, skipped tests, weak mounting, or ignoring the condition of the door.
The good news is that many mistakes are easy to avoid. Slow down. Read the manual. Test each step before moving on. A careful setup will help your opener last longer.
Installing the Opener on a Bad Door
This is the biggest mistake. A garage door opener should not be used to force a damaged door to work. If the door sticks, drags, slams shut, or feels heavy, stop before installing the opener.
The door should open and close by hand with smooth movement. It should not lean to one side. It should not shake badly. It should not need a strong pull to move.
If the door fails this test, the opener is not the real problem. Fix the door first. Then install the opener.
Mounting the Opener Off-Center
The opener must line up with the door. If the rail sits too far left or right, it may pull the door unevenly. This can cause shaking, scraping, and extra wear.
Use a tape measure and level before drilling. Mark the center of the door. Check the header bracket position. Then check again before mounting the opener.
A few minutes of measuring can prevent years of annoying noise.
Using Weak Ceiling Supports
The motor unit needs strong support. Do not mount it into weak drywall or thin material. The opener moves, vibrates, and carries load during operation.
Use proper ceiling framing or strong hanging brackets. If your garage ceiling does not have a clear support point, you may need extra angle iron or framing help.
A loose opener can shake, shift, or fall. This is not an area where you should cut corners.
Ignoring the Safety Sensors
Safety sensors are not optional. They help stop the door from closing on people, pets, bikes, tools, or boxes. If they are not aligned, the opener may not close at all. Worse, the safety system may not work right.
Place the sensors at the correct height from the floor. Make sure they face each other. Keep the wire secure and out of the way.
After installation, test the sensors. Block the sensor beam while the door is closing. The door should stop and reverse. If it does not, do not use the opener until the issue is fixed.
Setting the Travel Limits Wrong
Travel limits tell the opener where the door should stop. If the close limit is set too far, the opener may push hard against the floor. If the open limit is wrong, the door may not open fully.
Wrong limits can strain the motor and door. They can also cause the door to reverse for no clear reason.
Set the limits slowly. Make small changes. Test the door after each change. The goal is smooth movement, not force.
Reusing Old Parts Without Checking Them
It may seem easy to reuse old brackets, wires, rails, or sensors. But old parts may not match your new LiftMaster garage door opener. They may also be worn, bent, or unsafe.
Use the parts that come with your opener unless the manual says another part is okay. This is especially important for rails, safety sensors, and mounting hardware.
A new opener deserves a clean setup. Old parts can create new problems.
Forgetting to Program and Test Everything
The job is not done when the door moves once. You still need to test the remote, wall control, keypad, light, safety reverse system, and smart features.
If your model has Wi-Fi, connect it to the myQ app and test it while you are still near the opener. Make sure the door status shows correctly. Also check that alerts and controls work as expected.
Test the door several times. Listen for strange sounds. Watch for jerky movement. If anything looks off, fix it before daily use.
How Long Does Installation Usually Take?
A LiftMaster garage door opener installation can take a few hours or most of the day. The time depends on your skill level, garage setup, opener type, and door condition. A simple replacement is usually faster than a first-time installation.
For many homeowners, a DIY installation may take 4 to 6 hours. A professional may finish a standard job in less time. But complex setups can take longer for anyone.
Simple Replacement: 2 to 4 Hours
A simple replacement is the fastest type of installation. This means you already have an opener, and you are replacing it with a similar ceiling-mounted model.
Some parts may already be in place, such as the outlet, wall control wire path, and ceiling support area. That can save time. But you still need to check every part before reuse.
Do not assume the old rail, brackets, or sensors will work with the new opener. Check the manual first. If the parts do not match, install the new ones.
New Installation: 4 to 6 Hours
A new installation usually takes longer. You may need to mount the header bracket, set up ceiling supports, run wires, install sensors, and program controls from scratch.
If you are doing this for the first time, give yourself extra time. Read each step before doing it. Lay out the parts. Keep the manual nearby.
It is better to finish slowly and safely than to rush and redo the job later.
Wall Mount Opener Installation: Time Can Vary
A wall mount LiftMaster opener can take a different amount of time. These models mount beside the garage door instead of on the ceiling. They can free up ceiling space and reduce overhead hardware.
But they also need the right door setup. Not every garage door works with a wall mount opener. The door, torsion bar, side space, and power source must all fit the model requirements.
If your garage is ready for it, the job may be smooth. If not, it may take longer or need a professional.
What Can Slow the Job Down?
Several things can add time to the installation. Missing parts are one common issue. Old hardware can also slow you down, especially if bolts are rusted or brackets are bent.
A weak ceiling support can add time because you may need extra framing or hanging material. A tall garage door may also need an extension kit.
Smart setup can take extra time too. Wi-Fi issues, app setup, remote programming, and keypad pairing may add more steps after the opener is mounted.
How to Save Time Before You Start
You can save time by preparing the garage first. Move cars, bikes, boxes, and tools away from the door area. Make sure you have good lighting. Charge your drill battery. Place all parts on the floor and match them with the manual.
Also test the garage door by hand before you begin. This one step can save hours. If the door has a problem, you can fix that first instead of finding out halfway through the opener installation.
A little prep makes the whole job smoother. It also helps you avoid mistakes when you are tired near the end.
Safety Tips Before You Start
A LiftMaster garage door opener installation can look simple at first. But you are working with a heavy moving door, overhead parts, power, and safety sensors. So take a slow and careful approach.
Do not treat this like a race. A clean, safe setup matters more than speed. If a step feels unsafe or unclear, stop and check the manual before moving on.
Read the Manual for Your Exact Model
Start with the official LiftMaster manual for your opener model. Do not rely only on a general video or quick guide. A belt drive opener, chain drive opener, and wall mount opener may all have different steps.
The manual will show the correct parts, bracket locations, wiring path, sensor height, and adjustment process. Follow it closely. If your setup does not match the manual, do not guess.
Test the Garage Door by Hand First
Before you install the opener, test the door without the motor. Lift the garage door by hand. It should move smoothly and stay partly open without slamming down.
If the door feels too heavy, sticks, drops fast, or moves unevenly, stop. The problem is likely with the door system, not the opener. Installing a new opener on a bad door can damage the motor and create safety risks.
Do Not Adjust Garage Door Springs Yourself
Garage door springs are under high tension. They help carry the weight of the door. If handled the wrong way, they can cause serious injury.
Do not adjust, remove, loosen, or replace springs during a DIY opener installation. The same goes for cables and bottom brackets. If you think the spring system has a problem, call a trained garage door technician.
Use a Stable Ladder and Get a Helper
You will need to work above your head. Use a sturdy ladder on a flat surface. Do not stand on chairs, buckets, boxes, or stacked items.
A helper can make the job much safer. One person can hold the opener or rail while the other checks alignment and secures the parts. This is especially helpful when lifting the motor unit into place.
Turn Off Power When Needed
Be careful around power connections. If your opener needs wiring beyond a normal plug-in setup, do not improvise. Poor wiring can cause shock, damage, or opener failure.
If you are not comfortable with electrical work, hire a qualified electrician or garage door technician. It is better to pay for help than risk a dangerous setup.
Keep Kids and Pets Away
Keep children and pets out of the garage while you work. Small parts, sharp brackets, ladders, tools, and moving door sections can all create risk.
After installation, teach family members how to use the opener safely. Do not let children play with remotes, wall controls, or the myQ app.
Test the Safety Reverse System
Once the opener is installed, test the safety system before daily use. The door should stop and reverse if the safety sensor beam is blocked. It should also reverse if it meets resistance while closing.
Do not skip this test. Safety sensors are one of the most important parts of a garage door opener installation. If the door does not reverse as it should, stop using the opener until the issue is fixed.
When You Should Hire a Professional
DIY can work for some homeowners. But there are times when professional installation is the smarter choice. A garage door opener must be safe, aligned, and tested. If the door or setup has problems, a pro can save you time and reduce risk.
You do not need to prove anything by doing the job yourself. Sometimes the best DIY decision is knowing when to stop.
The Door Feels Heavy or Unbalanced
Hire a professional if the garage door feels heavy when you lift it by hand. Also call a pro if the door will not stay partly open, drops fast, or pulls to one side.
These signs may point to a spring, cable, or balance problem. A LiftMaster opener should not be used to force a heavy door open. That can strain the motor and make the system unsafe.
The Door Shakes, Sticks, or Makes Loud Noises
A noisy garage door opener is often blamed on the motor. But the real issue may be the door itself. Worn rollers, loose hinges, bent tracks, or poor alignment can all cause noise and rough movement.
If the door shakes or sticks before the opener is installed, fix that first. A new opener may hide the problem for a while, but it will not solve it.
You Have a Tall, Heavy, or Custom Door
Some garage doors need special parts or stronger openers. This includes 8-foot doors, heavy wood doors, insulated doors, and oversized doors.
A taller door may need an extension kit. A heavy door may need a certain opener type. A weak top panel may need reinforcement before the opener arm is attached.
If your door is not standard, professional help is often worth it.
Your Garage Has Low Ceilings or Odd Framing
Not every garage has a simple ceiling setup. Some have low clearance, exposed beams, uneven framing, or limited mounting space. This can make a ceiling mount opener harder to install.
A professional can decide if your garage needs extra supports, special brackets, or a different opener style. In some cases, a wall mount LiftMaster opener may be a better fit.
You Are Installing a Wall Mount LiftMaster Opener
Wall mount openers can be a great choice. They free up ceiling space and can look cleaner. But they also need the right door setup.
The opener must fit beside the door. The torsion bar and side clearance must meet the model requirements. If you are not sure, have a pro inspect the garage first.
You Feel Unsure at Any Point
This may be the most important sign. If you feel unsure, stop. Do not force the installation just because you already started.
A garage door is heavy. The opener moves it many times a week. Small setup errors can turn into bigger problems later. If you feel stuck, call a professional and protect your home, your opener, and your safety.
Final Thoughts
A LiftMaster garage door opener installation can be a smart upgrade. It can make your garage easier to use, safer, and more secure. Many models also add useful features like quiet operation, battery backup, remote access, and smart control through the myQ app.
But the opener is only one part of the system. The garage door itself must be in good shape first. If the door is heavy, damaged, noisy, or unbalanced, fix that before installing the opener.
If you are handy and your door works well, DIY installation may be a good weekend project. Just take your time, follow the manual, use the right tools, and test the safety features when you finish.
If the setup looks complex, call a pro. That is not a failure. It is a smart choice when safety, wiring, springs, or door balance come into play.
The best result is simple: a garage door that opens smoothly, closes safely, and works every time you need it.
You Might Also Like
🛠️
LiftMaster Repair Guide
Is your current LiftMaster flashing codes or refusing to close? Try our step-by-step troubleshooting guide before replacing the whole unit.
How much does LiftMaster garage door opener installation cost?
The cost depends on the opener model, labor, door size, and extra parts. DIY installation usually costs less because you only pay for the opener and supplies. Professional installation costs more, but it can save time and reduce risk.
Extra costs may include an extension kit, keypad, battery backup, door reinforcement bracket, old opener removal, or garage door repairs.
Can I install a LiftMaster garage door opener myself?
Yes, you can install some LiftMaster garage door openers yourself if your garage door is balanced and you feel comfortable with tools. You should be able to use a ladder, drill, wrench, level, and measuring tape.
Do not install it yourself if the door feels heavy, sticks, shakes, or has broken parts. Fix the door first or call a professional.
How long does it take to install a LiftMaster garage door opener?
A simple replacement may take 2 to 4 hours. A new DIY installation may take 4 to 6 hours or more. The time depends on your skill level, garage layout, opener type, and whether extra parts are needed.
Wall mount openers, tall doors, and unusual ceiling setups may take longer.
Do LiftMaster garage door openers come with installation?
Most LiftMaster garage door openers do not automatically include installation when you buy the unit. Installation depends on where you buy it and whether the seller offers setup service.
Some dealers or garage door companies may include installation in a package. Always check what is included before you buy.
Is LiftMaster better than Chamberlain?
LiftMaster and Chamberlain are closely related brands, but they often serve different buyers. LiftMaster is commonly sold through professional dealers and may focus more on pro-grade installation. Chamberlain is often sold for DIY homeowners through retail stores.
The better choice depends on your needs. If you want dealer support and professional installation, LiftMaster may be a strong choice. If you want a DIY-friendly opener, Chamberlain may be easier to buy and install.
Do I need Wi-Fi for a LiftMaster garage door opener?
No, Wi-Fi is not required for basic opening and closing. The wall control and remote can still work without Wi-Fi.
You need Wi-Fi if you want smart features, such as app control, alerts, schedules, and remote access through myQ. If your garage has weak Wi-Fi, you may need to improve the signal before using smart features.
Why won’t my LiftMaster garage door opener close after installation?
The most common reason is a safety sensor issue. The sensors may be misaligned, blocked, dirty, loose, or wired incorrectly. Check that both sensors face each other and that nothing blocks the beam.
Other causes may include wrong travel limits, door binding, remote issues, or a problem with the wall control. If basic checks do not fix it, stop using the opener and get help.
Should I replace my garage door opener or repair it?
Replace the opener if it is very old, noisy, unreliable, lacks safety sensors, or does not support the features you want. A new LiftMaster garage door opener can improve safety, comfort, and smart control.
Repair may make sense if the opener is newer and the issue is small. But if the garage door itself has problems, repair the door first. A new opener will not fix broken springs, worn rollers, bent tracks, or a weak door panel.
Nataliya Vaitkevich
Expertise: Consumer Product Testing, Comparison Analysis, and Value Assessment. Nataliya is a seasoned product reviewer who puts everyday items through their paces—from kitchen gadgets to cutting-edge electronics. Her methodology focus on helping readers find the best value for their money. She cuts through the marketing hype to deliver honest, practical advice you can trust before you buy.