That loud pop or bang from your engine is not just noise. It tells you something is wrong. Unburned fuel is igniting in the wrong place. You want to know what causes car backfire. You also want to solve it yourself. This guide breaks down every common reason. I will show you how to diagnose the issue step by step.
You will learn real DIY car backfire repair steps that actually work. I will share the exact tools you need. I will also tell you when to stop and call a pro. Always work on a cool engine. Wear safety glasses and gloves. Never skip basic precautions. Your safety matters more than any shortcut.
What Exactly Is a Car Backfire?
Engines burn fuel to make power. The fire should stay inside the cylinders. Sometimes fuel slips out. It ignites in the intake or exhaust system. That extra pop is a backfire. You need to understand exhaust backfire vs intake backfire. The location changes the sound and the fix. Exhaust pops happen when you let off the gas. You hear sharp cracks behind the car.
Intake pops happen when you step on the gas. You hear a boom from under the hood. Modern cars rarely backfire. Smart computers control the fuel and spark. When your car pops, a sensor or part has failed.
The 7 Most Common Reasons for Engine Pops
Let us look at the main reasons your engine acts up. Knowing why is my car backfiring will save you time. You can track down the exact part that needs attention.
Rich Air and Fuel Mix
Your engine needs the right balance. Too much fuel creates a rich mix. Extra fuel survives the burn cycle. It travels into the hot exhaust. It ignites with a loud pop. Dirty air filters cause this. Leaky fuel injectors also add too much gas. A bad oxygen sensor ruins the balance.
Ignition System Failure
Spark plugs fire the fuel at the exact right moment. Worn plugs fail to fire the mix completely. Cracked coils send weak sparks. Damaged plug wires leak power. The leftover fuel travels downstream. It explodes in the exhaust or intake. This creates the classic misfire pop.
Exhaust System Leaks
Metal cracks under heat. Gaskets wear out over time. A cracked manifold lets fresh air into the exhaust. That extra oxygen mixes with leftover fuel. The heat ignites it. You hear sharp cracks during idle or acceleration. Check your pipes early. Small leaks grow fast.
Vacuum Leaks and Intake Issues
Your engine breathes through sealed hoses. Rubber cracks in the sun. Intake gaskets shrink with age. Unmetered air slips into the system. The mix runs too lean. The computer struggles to adjust. You get delayed sparks and sudden pops. Listen for a faint hiss. It points straight to the leak.
Incorrect Engine Timing
Valves must open and close in perfect rhythm. A stretched timing chain breaks that rhythm. A jumped belt shifts the whole schedule. Fuel burns while valves are still open. The fire escapes into the exhaust. This cause needs careful attention. It often triggers harsh symptoms.
EGR Valve or PCV System Malfunction
These small valves manage engine flow. A stuck open EGR valve floods the chamber with exhaust gas. A clogged PCV valve traps pressure. Both upset the burn cycle. You get rough idle and random pops. Cleaning them often solves the issue.
Aftermarket Tuning or Exhaust Mods
Many drivers want louder engines. They remove mufflers or change the tune. The factory computer loses control. Unburned fuel exits freely. Hot pipes ignite it on purpose. Some drivers love the sound. The sound masks real engine stress. Keep your setup legal and safe.
How to Diagnose the Problem Yourself
You do not need a fancy shop to find the issue. Follow these clear steps. You will save money on guesswork.
Tools You Will Actually Need
Scanner and Basic Gear
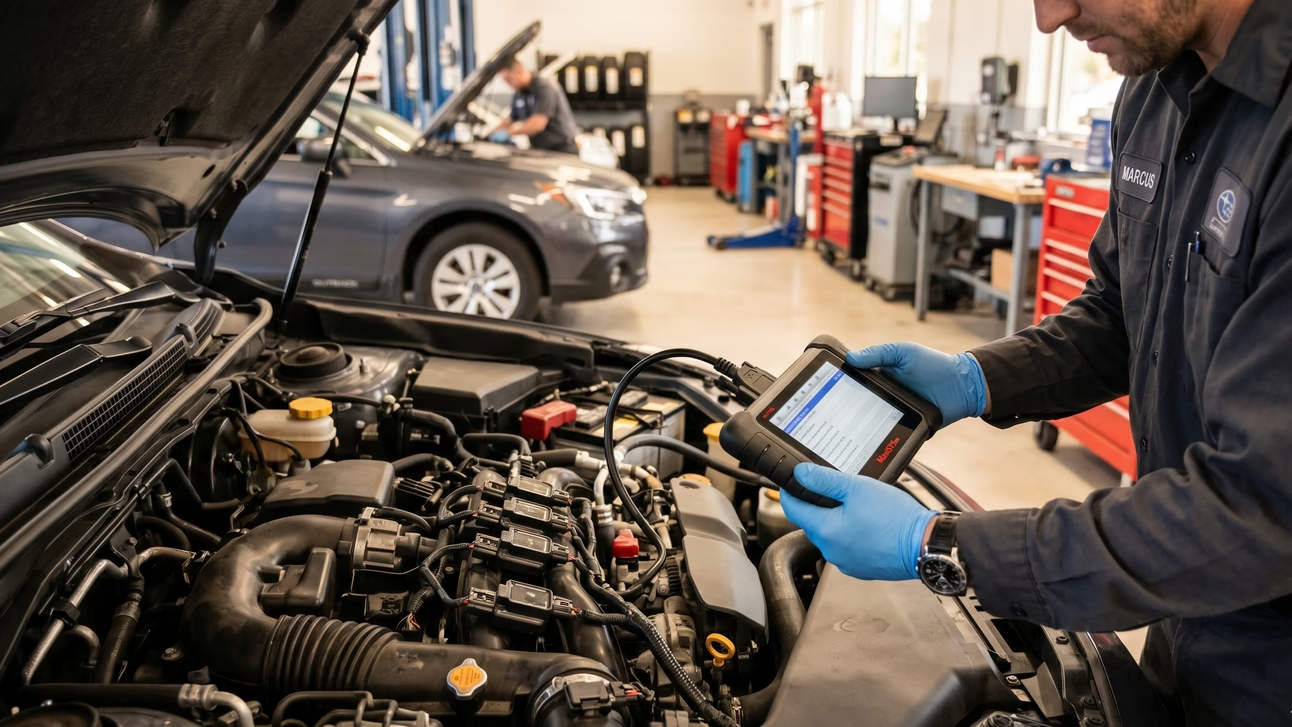
Grab a reliable OBD2 reader. Buy a basic multimeter. Keep a socket and wrench set handy. You need a spark plug socket. A vacuum gauge helps a lot. Use a smoke tester or carb cleaner for leak checks. Bring a bright flashlight. Wear safety gloves and glasses. Skip cheap scanners that freeze. A mid-range Bluetooth reader gives live data. It saves hours of guessing. I only list tools that hold up under real use.
Step One: Pull and Read Diagnostic Codes
Plug your scanner into the port under the dash. Turn the key without starting the car. Read the codes on the screen. Look for misfire numbers. Note fuel mix codes. Check exhaust trouble codes. Write down every code. Match them to your symptoms. The codes point you to the right system.
Step Two: Visual and Sound Check
Pop the hood. Look for cracked rubber hoses. Check for loose wires or burnt spots. Look for black soot near the exhaust. Smell the air for raw fuel. Start the engine in a safe space. Listen for ticks or hisses. Note when the pop happens. Does it hit on startup? Does it hit on deceleration? Your notes guide the next steps.
Step Three: Test Fuel and Air Delivery
Remove the air filter. Check for heavy dirt or oil. Clean it or swap it out. Locate the air flow sensor. Wipe it with a safe cleaner. Do not touch the thin wires. Check your fuel trims on the scanner. High positive numbers mean a lean mix. High negative numbers mean a rich mix. These numbers confirm your next move.
Step Four: Ignition System Check
Pull each spark plug one at a time. Look at the tip. Black soot means too much fuel. White ash means a lean burn. Check the gap with a feeler gauge. Replace plugs that look worn. Swap ignition coils between cylinders. Clear the codes. Drive the car. If the misfire moves, the coil is bad. Swap tests save money on wrong parts.
Step Five: Vacuum Leak Detection
Spray carb cleaner near hose joints. Listen for a change in engine pitch. A jump in RPM means a leak. Use a smoke tester for safer results. Pump smoke into the intake. Watch for white wisps escaping. Mark the leak spot. Replace the cracked hose right away.
Step Six: Exhaust Leak Verification
Let the car cool completely. Mix soap and water in a spray bottle. Spray joints while the engine runs. Bubbles reveal the gap. Use an infrared thermometer to scan pipes. Cold spots on hot sections show blockages. Tap manifolds gently with a rubber mallet. Listen for loose bolts. Tighten them to spec. Replace blown gaskets if needed.
Extended Steps for Car Backfire Causes and Fixes
You found the cause. Now let us fix it. I will walk you through each repair. You will see the exact steps. I will warn you about common traps.
Clean and Replace Air Filter and Air Flow Sensor
Open the air box. Remove the old filter. Drop in a fresh one. Locate the sensor on the intake tube. Unclip the connector. Remove the mounting screws. Spray cleaner on the element. Let it dry completely. Reinstall it. Torque the screws lightly. Reconnect the plug. Clear any stored codes. Take a short drive. The car should run smoother. Never use brake cleaner on the sensor. It ruins the coating.
Replace Spark Plugs and Ignition Coils
Remove the coil pack. Pull out the old plug. Check the gap on the new plug. Seat it by hand first. Turn it with a wrench. Follow the torque spec. Repeat for each cylinder. Reinstall coils. Push them down until they click. Tighten the bolt. Do not force them. Cheap plugs fail fast. Stick to trusted brands. NGK and Denso last longer. Proper installation stops random pops.
Repair Vacuum Leaks
Trace the bad hose from start to end. Cut out the cracked section. Slide on new vacuum hose. Secure it with clamps. Check the intake gasket area. Remove the throttle body. Scrape off old gasket material. Wipe the surface clean. Lay down a fresh gasket. Reassemble in reverse order. Start the engine. Listen for the hiss. It should be gone. Duct tape never holds under heat. Use proper parts.
Fix Exhaust Leaks and Replace Gaskets
Wait for the pipes to cool. Remove the flange bolts. They often stick. Use penetrating oil. Let it sit. Remove the old gasket. Clean both metal faces. Place the new gasket. Line up the bolt holes. Hand tighten first. Cross tighten them evenly. Check the flex pipe for cracks. Replace it if it rusts through. Broken studs require special tools. Do not force them. A mechanic can extract them safely.
Clean or Replace EGR and PCV Valves
Locate the EGR valve on the intake. Remove the mounting bolts. Take off the gasket. Soak the valve in carb cleaner. Use a soft brush on the ports. Rinse and dry it. Reinstall with a new gasket. Find the PCV valve on the valve cover. Pull it out. Shake it. It should rattle. If it does not rattle, swap it. Push the new one in firmly. Clear codes and test. Many modern EGR valves use electronics. They need a scanner reset after cleaning.
Address Timing Issues
Remove the timing cover. Align the marks on the gears. Check the chain tension. Look for worn guides. Replace the tensioner if it leaks. Install a new timing kit. Follow the manual step by step. Torque everything to spec. Reinstall the cover. Start the engine. Listen for smooth operation. I must be honest with you. This repair carries real risk. One wrong step bends valves. If you lack experience, pause. Hire a certified shop. Do not gamble with internal engine parts.
When to Stop DIY and Call a Mechanic
DIY saves money. It does not replace professional judgment. Stop if you see major red flags. Watch for a melted converter. Notice persistent misfires after you fix parts. See limp mode warnings on the dash. Hear grinding from the timing area. These signs mean deep trouble. A wrong guess costs thousands. A pro has the right tools. They pull live data safely. They check internal wear without guessing. You protect your wallet by knowing your limits.
Preventive Maintenance to Stop Pops Before They Start
Catch problems early. Check your spark plugs every year. Swap air filters on schedule. Inspect vacuum hoses at each oil change. Scan your car once a month. Catch codes before they cause damage. Use quality fuel. Stick to the correct octane. Avoid aggressive tunes on stock cars. Keep your computer software current. Factory updates fix known glitches. Simple care stops loud pops.
It keeps your engine running smooth. Tracking your service dates helps. I recommend a simple car care app. Tools like Drivvo or Fuelio help you remember oil changes. They store scanner reports. They keep your maintenance history clean. I share these apps because they save you headaches.
Frequently Asked Questions
Is a car backfire dangerous to drive with?
Yes. It signals unburned fuel in hot parts. It can melt your exhaust. It can crack your manifold. Drive only to a safe spot. Fix the issue before normal use.
Can bad gas or low octane cause backfiring?
Poor fuel burns unevenly. Low octane causes early detonation. The mix burns out of sync. You get random pops. Use clean fuel from trusted stations.
Why does my car backfire on deceleration vs acceleration?
Deceleration pops usually mean a lean mix. The engine pulls air while fuel cuts. Leftover gas ignites in the exhaust. Acceleration pops point to intake leaks. Fresh air enters too late. The spark fires at the wrong moment.
Does backfiring ruin the catalytic converter or engine?
Yes. Repeated pops send extreme heat downstream. The converter melts inside. Exhaust pressure builds up. The engine loses power. Fix the root cause fast.
Can I reset the check engine light after fixing a backfire?
Yes. Use your scanner to clear codes. Drive the car for a few days. The light should stay off. If it returns, the fix failed. Retrace your steps.
Do performance exhausts cause backfires intentionally?
Some tunes do. They leave extra fuel for sound. The hot pipes ignite it. This looks cool. It stresses engine parts. Daily driving needs clean combustion.
Final Checklist and Next Steps of What Causes Car Backfire
Review your diagnosis steps. Match the symptom to the cause. Pick the right fix. Gather your tools first. Work slowly and safely. Track your repairs. Log dates and mileage.
I earn a small commission on some links. I only share tools I trust. Your safety comes first. If you feel unsure, pause. Ask a certified mechanic.
A quick consult beats a costly mistake. Grab your gear. Follow the steps. Learn how to fix a backfiring car with confidence. Get your vehicle running quiet again.