A dirty nozzle can make a good pressure washer feel weak. The spray may look uneven. The stream may pulse. Or the machine may run fine, but the cleaning power drops fast.
In many cases, the problem is simple. You do not need a big repair. You just need to clean pressure washer nozzle parts the right way and clear out the clog. That small fix can bring the spray back to normal and save you time, water, and frustration.
This guide walks you through the easy fix first. Then it helps you spot the signs of a clogged pressure washer nozzle and understand what caused it. If your pressure washer nozzle is not spraying right, start here. A quick DIY pressure washer nozzle cleaning job may be all it takes.
The Fast Answer: How Do You Clean a Pressure Washer Nozzle?
If you want the short version, here it is.
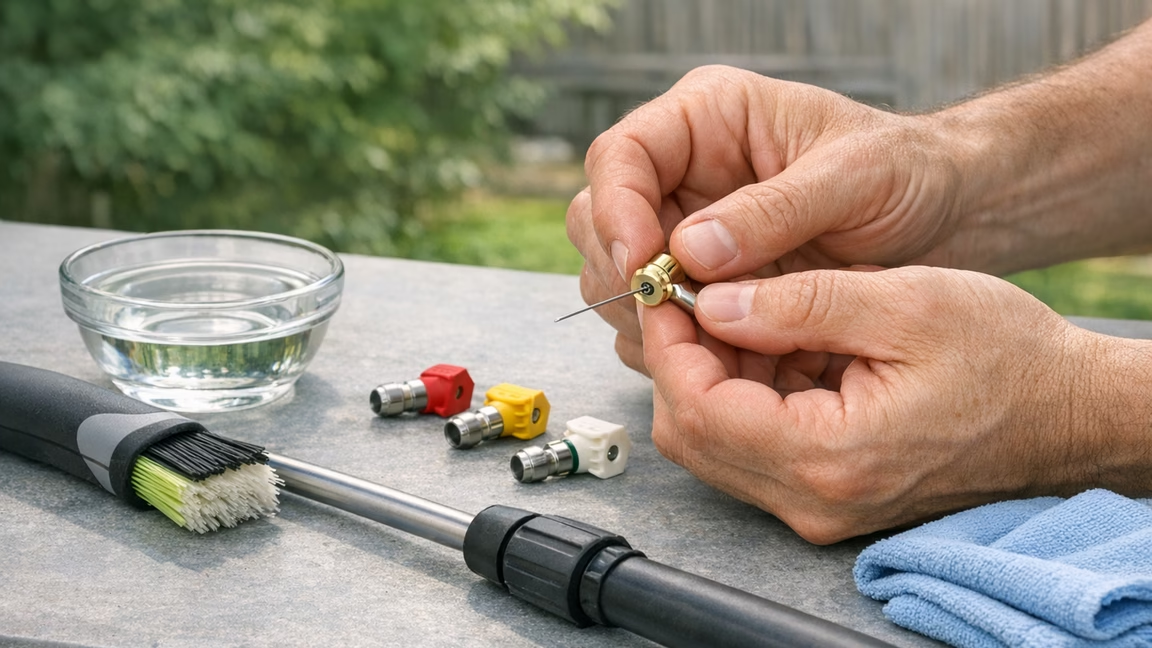
To clean a pressure washer nozzle, turn off the machine, shut off the water, and squeeze the trigger to release trapped pressure. Remove the nozzle tip from the wand. Then use a nozzle cleaning tool or a very thin wire to clear the opening. Rinse the tip with clean water. If you see white scale or hard buildup, soak the nozzle in vinegar for a while. Reinstall it and test the spray.
That is the basic method. It works well for most cases of pressure washer nozzle cleaning.
Quick Step-by-Step Fix
- Turn off the pressure washer
- Shut off the water supply
- Release any trapped pressure from the wand
- Remove the nozzle tip
- Check the opening for dirt, sand, or dried soap
- Use a cleaning pin or fine wire to remove debris from pressure washer nozzle parts
- Rinse the tip well
- Soak it in vinegar if mineral buildup is stuck inside
- Reattach the nozzle
- Test the spray pattern
Why This Works
The nozzle opening is small. Very small. That is what helps build spray force. But it also means tiny bits of grit can get stuck inside. A pressure washer nozzle blocked by sand, hard water, or soap residue cannot push water the right way. The result is low pressure, weak cleaning, or a spray pattern that looks off.
That is why learning how to clean pressure washer nozzle parts is one of the most useful maintenance skills for any owner. It is quick. It is cheap. And it often solves the problem on the spot.
A Few Safety Tips Before You Start
Before you try to fix pressure washer nozzle issues, slow down for a minute.
Never clean the tip while the system is still under pressure. Always turn the unit off first. Then squeeze the trigger to let the trapped pressure out. If you skip that step, the nozzle can pop loose or spray suddenly.
Also, avoid using anything thick or sharp that could widen the hole. If the opening gets damaged, the nozzle may never spray correctly again. Use a proper nozzle cleaner if you have one. If not, use the thinnest tool possible and work gently.
When the Quick Fix Is Enough
In many cases, the fast cleaning method is all you need. It usually works when:
- the spray suddenly becomes weak
- the fan pattern looks crooked
- one side sprays harder than the other
- the machine starts pulsing during use
- a pressure washer low pressure nozzle issue shows up without warning
If the nozzle still acts up after cleaning, the problem may be deeper. The hose, inlet screen, wand, or pump may need attention too. We will get to that later in the full guide. But first, let’s make sure the nozzle really is the problem.
Signs Your Pressure Washer Nozzle Needs Cleaning
A dirty nozzle does not always look dirty. Sometimes the first clue is poor performance. Other times the machine sounds different. If you know what to watch for, you can catch the problem early and avoid bigger headaches.
Weak or Reduced Water Pressure
This is the most common sign.
You pull the trigger, but the spray feels soft. The machine runs, yet the cleaning power is nowhere near normal. Dirt that would usually wash away stays in place. Jobs take longer. You end up moving closer to the surface just to get results.
That often points to a clogged pressure washer nozzle. Even a small blockage can cut the water flow and reduce force. The machine may still work, but it will not work well.
If you notice this kind of drop, pressure washer nozzle cleaning should be one of your first checks.
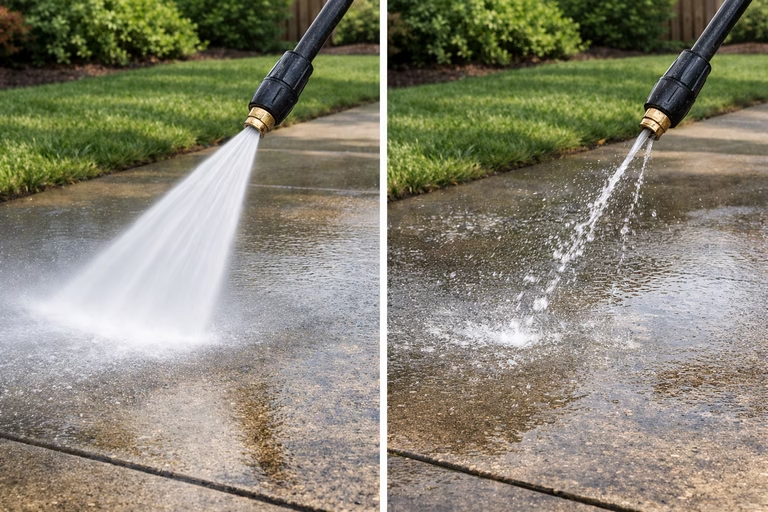
Uneven Spray Pattern
A healthy nozzle creates a clean, even spray. A dirty one does not.
You may see gaps in the fan pattern. One side may spray stronger than the other. The water may shoot at a strange angle. In some cases, the spray turns from a wide fan into a narrow line or random burst.
This is a strong clue that the nozzle opening has buildup inside it. Dirt, sand, or hard water deposits can change the shape of the spray. If your pressure washer nozzle is not spraying right, the tip is often the first place to inspect.
Pulsing or Sputtering
A clogged nozzle can also make the flow feel unstable.
Instead of a smooth spray, the stream may pulse, spit, or surge. The pressure may come and go while you work. That can make cleaning harder and less safe, especially on delicate surfaces.
Now, pulsing does not always mean the nozzle is the only problem. Air in the system or a water supply issue can do it too. But a dirty tip is still a common cause, and it is the easiest one to rule out first.
Spray Direction Looks Off
Sometimes the water shoots slightly left, right, up, or down instead of straight ahead. That may not seem like a big deal at first. But it usually means the nozzle opening is partly blocked on one side.
When that happens, water cannot pass through evenly. The spray gets pushed off course. That is a simple clue that you may need to unclog pressure washer nozzle parts before the problem gets worse.
Cleaning Takes Longer Than Usual
This sign is easy to miss because it happens slowly.
Maybe the pressure washer still works, but every job feels harder. You spend more time on small patches. The machine seems less effective than it used to be. You may think the pump is aging or the unit is wearing out.
Sometimes that is true. But often, the nozzle just needs a good cleaning.
A dirty tip can lower performance enough to waste time without making the problem obvious. That is why regular DIY pressure washer nozzle cleaning is worth doing, even before the spray becomes noticeably bad.
What Causes a Pressure Washer Nozzle to Get Clogged?
Nozzles do not clog for no reason. If you understand what gets inside them, you can fix the issue faster and stop it from coming back.
Dirt and Sand in the Water Supply
This is one of the biggest causes.
Tiny bits of dirt, sand, and grit can enter through the hose or water source. They travel through the washer and end up trapped in the nozzle opening. Since the tip opening is so small, it does not take much to cause trouble.
This is more common if you use an old hose, a dirty outdoor spigot, or water from a source that carries sediment. Once those particles get inside, your pressure washer nozzle blocked problem can appear fast.
Mineral Deposits From Hard Water
Hard water leaves behind minerals over time. Those minerals can stick to the inside of the nozzle and slowly narrow the opening.
At first, you may not notice it. Then the spray starts to weaken. The pattern gets messy. The tip may even look chalky or crusted over. That is why vinegar often helps. It can loosen scale and make it easier to remove debris from pressure washer nozzle openings.
If you live in an area with hard water, this cause should be high on your list.
Soap Residue and Chemical Buildup
Detergent helps with cleaning, but leftover soap can create its own problem.
If the machine is not flushed after use, soap residue can dry inside the nozzle or nearby parts. Over time, that residue hardens and restricts flow. Some cleaning chemicals can also leave deposits behind if they sit too long.
That buildup can look harmless, but it can still affect the spray. If you use detergent often, pressure washer nozzle cleaning should become part of your regular routine.
Rust or Debris From Worn Parts
Older pressure washers can shed small particles from worn metal parts, hoses, or fittings. Rust flakes and rubber bits may break loose and move through the system. Those small pieces often end up at the nozzle.
This is one reason why the same clog keeps coming back. You clean the tip, and it works for a while. Then it clogs again because the real source is elsewhere in the machine.
If that happens, do not just clean the nozzle. Check the hose, connectors, and filters too.
Infrequent Cleaning and Poor Storage
Sometimes the cause is simple neglect.
If you put the washer away without flushing it out, residue can dry inside the tip. If the nozzles sit in a dirty toolbox or damp shed, they can collect grime or corrosion. If you rarely inspect them, small clogs can build into bigger ones.
Good storage habits matter. A clean, dry place helps protect the tips. So does a quick rinse after each use. If you want to fix pressure washer nozzle problems for good, prevention matters just as much as repair.
Tools and Supplies You’ll Need
You do not need a huge toolbox for this job. In most cases, a few simple items will do the trick. The goal is to clear the clog without damaging the tip.
Basic DIY Tools
Start with the basics.
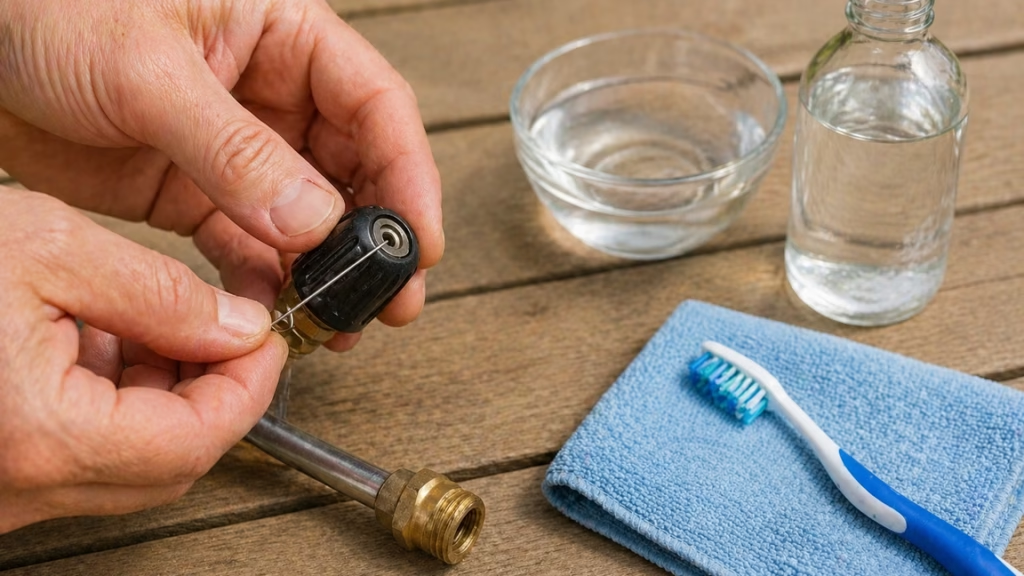
A nozzle cleaning tool is the best option. Many pressure washers come with one. It looks like a small pin or wire. It is made to fit inside the nozzle opening without causing damage.
You should also have a soft brush or an old toothbrush. This helps scrub off dirt on the outside of the tip.
A small bowl of warm water is useful too. It helps loosen grime and makes rinsing easier.
Keep some white vinegar nearby. It works well on mineral buildup from hard water. If your nozzle has white crust or scale, vinegar can help break it down.
You will also want a clean cloth or rag for drying the parts before you put them back.
If possible, wear gloves and eye protection. This is a small job, but safety still matters.
Optional Tools for Stubborn Clogs
Some clogs are more stubborn. If the tip has been dirty for a while, a few extra items can help.
A pair of needle-nose pliers can make it easier to remove a stuck nozzle. Use them gently. You do not want to crush or scratch the tip.
A flashlight helps you inspect the nozzle opening. It can be hard to see tiny bits of sand or dried soap without one.
You may also want compressed air. A short blast can help push out loose debris after you clear the opening.
And if the tip looks worn or damaged, keep a replacement nozzle on hand. Sometimes the fastest fix is not cleaning. It is swapping in a fresh tip.
What Not to Use
This part matters.
Do not use a thick nail, drill bit, or any large metal object. It may seem like a quick fix, but it can widen the opening. Once that happens, the spray pattern may never return to normal.
Also skip harsh chemicals unless the maker says they are safe. Strong cleaners can damage the finish or weaken small parts.
If your goal is to remove debris from pressure washer nozzle parts safely, gentle tools are the smart choice.
Safety First Before You Clean the Nozzle
This is a quick job, but you still need to do it the right way. Pressure washers use force. Even when the machine is off, pressure can stay trapped inside the wand or hose.
Take a minute here. It is worth it.
Turn Off the Machine Completely
First, shut the machine down.
If you have an electric model, unplug it. If you have a gas unit, turn off the engine. Do not work on the nozzle while the machine can still start or spray.
This step sounds obvious, but it is easy to rush past when you just want to fix the problem fast.
Shut Off the Water Supply
Next, turn off the water at the source.
This stops fresh water from feeding into the system while you work. It also makes the rest of the process cleaner and easier.
If the hose is easy to remove, go ahead and disconnect it too.
Release Trapped Pressure
This is one of the most important steps.
After the machine is off, squeeze the trigger on the spray gun. Hold it until water stops coming out or the pressure feels gone. This lets trapped pressure escape from the system.
If you skip this, the nozzle may pop out suddenly when you remove it. That can be dangerous.
Before you try to unclog pressure washer nozzle parts, always make sure the system is no longer pressurized.
Let the Machine Cool Down
If you just finished using the washer, let it sit for a few minutes.
Some parts may be warm, especially on gas models. A short wait makes the job more comfortable and safer.
Work in a Clear, Well-Lit Spot
Try to clean the nozzle in a bright area where you can see what you are doing. These parts are small. Dirt and buildup can be hard to spot.
A flat surface also helps. You do not want the nozzle rolling away into grass, gravel, or a crack in the floor.
A little setup now makes the whole pressure washer nozzle cleaning process smoother.
How to Clean a Pressure Washer Nozzle Step by Step
Now let’s do the actual fix.
This method works well for most home pressure washers. It is simple, safe, and effective. If your pressure washer nozzle is blocked by dirt, dried soap, or hard water buildup, these steps should help.
Step 1: Turn Off the Pressure Washer and Release Pressure
Before you touch the nozzle, make sure the machine is fully off.
Shut down the motor or unplug the unit. Turn off the water. Then squeeze the trigger to release any pressure left in the system.
Do not rush this part. It is the first step in every safe fix pressure washer nozzle job.
Step 2: Remove the Nozzle From the Spray Wand
Now take the nozzle off the wand.
If your washer uses quick-connect tips, pull back the collar and slide the nozzle out. If it uses a threaded tip, unscrew it slowly.
Set the nozzle somewhere clean. These parts are small, so do not place them on dirt or grass where they can pick up more debris.
Step 3: Inspect the Nozzle for Visible Debris
Take a close look at the opening.
Hold the tip under good light. A flashlight helps here. Check for sand, dirt, dried detergent, or white mineral crust. Even a tiny bit of debris can cause a clogged pressure washer nozzle.
Also look at the outside of the nozzle. If you see rust, cracks, or signs of wear, cleaning may not be enough.
Step 4: Use a Nozzle Cleaning Tool to Clear the Opening
This is the key step.
Insert the cleaning tool, pin, or thin wire into the nozzle opening very gently. Move it back and forth with a light hand. You are trying to loosen the clog, not force the hole wider.
If debris is packed inside, pull the tool out and wipe it clean. Then repeat the process.
Go slow. The goal is to clean pressure washer nozzle parts without damaging the tip.
Step 5: Rinse the Nozzle With Clean Water
Once you loosen the clog, rinse the nozzle well.
Run clean water through it to flush out the debris. If possible, rinse from both directions. That can help push loose grit all the way out.
This step is simple, but it matters. A clog may break apart into smaller pieces, and you want those pieces gone before you reinstall the nozzle.
Step 6: Soak the Nozzle in Vinegar for Mineral Buildup
If the tip still looks crusty or clogged, soak it in white vinegar.
Place it in a small bowl and let it sit for at least 30 minutes. If the buildup is heavy, leave it longer. The vinegar helps soften hard water deposits and dried residue.
After soaking, scrub the outside lightly with a soft brush. Then use the cleaning tool again if needed.
This part is especially helpful when you need to remove debris from pressure washer nozzle tips affected by hard water.
Step 7: Dry and Reinstall the Nozzle
Once the tip looks clear, dry it with a clean cloth.
Then attach it back to the wand. Make sure it seats properly. If it is a quick-connect style, check that it locks into place. If it screws on, tighten it snugly but do not overdo it.
A loose nozzle can affect the spray and create a safety issue.
Step 8: Test the Spray Pattern and Pressure
Turn the water back on. Then start the pressure washer and test the spray in a safe area.
Watch the pattern closely. It should look even and steady. The pressure should feel stronger than before. If the stream still looks weak or crooked, try cleaning the tip one more time.
If the issue stays, the nozzle may be worn out or the problem may be somewhere else in the system.
That is why pressure washer nozzle cleaning is the first fix, not always the only one.
A Quick Tip Before You Move On
If the spray improves after cleaning, great. You found the problem.
If it does not, do not assume the whole machine is failing. A blocked filter, kinked hose, or worn tip can create the same symptoms. The good news is that those are still DIY-friendly problems in many cases.
Extended DIY Fix: What to Do if Cleaning the Nozzle Does Not Work
Sometimes the nozzle is only part of the problem. You clean it, test it, and the spray still looks weak or uneven. That does not always mean the machine is failing. In many cases, another small issue is holding it back.
Here are the next DIY checks to make.
Check the Water Inlet Screen
Start with the water inlet screen.
This small filter sits where the garden hose connects to the pressure washer. Its job is to catch dirt before it enters the machine. If it gets clogged, water flow drops. That can look a lot like a pressure washer low pressure nozzle issue.
Remove the hose and look inside the inlet. If the screen looks dirty, rinse it with clean water. If needed, brush it gently with a soft toothbrush.
A dirty inlet screen can reduce pressure fast. It is one of the easiest fixes to miss.
Inspect the Hose for Kinks or Blockage
Next, look at the hose.
A sharp bend can slow the water flow. A blockage inside the hose can do the same thing. If the machine cannot get a steady water supply, the nozzle will not spray the way it should.
Stretch the hose out and check the full length. Look for twists, tight loops, or soft spots. If the hose is old, debris may be trapped inside.
If you are trying to fix pressure washer nozzle symptoms, always check the hose too. The problem may be upstream.
Try a Different Nozzle Tip
This is a smart test.
Swap in another nozzle and see what happens. If the spray improves right away, your original tip may still be blocked or worn out. If nothing changes, the issue may be elsewhere in the system.
This quick switch can save time. It also helps confirm whether you are dealing with a clogged pressure washer nozzle or a different fault.
If you have a full set of color-coded tips, try one that matches the job and test it on a safe surface.
Clean the Spray Wand and Lance
Debris does not always stop at the tip.
Sometimes dirt gets stuck in the spray wand or lance. That means you can clean pressure washer nozzle parts and still have poor performance because the blockage sits behind them.
Disconnect the wand and flush it with clean water if you can. Look inside for dirt or buildup. A small bit of debris in the wrong spot can affect the spray pattern.
This check is simple, but it can solve a problem that looks bigger than it is.
Remove Air From the System
Air in the line can cause pulsing and sputtering.
If the water flow feels uneven, trapped air may be part of the issue. This often happens after you reconnect hoses or start the unit after storage.
To clear it, connect the water supply and turn the water on. Leave the machine off. Then squeeze the trigger and let water run through the wand for a minute or two. This helps push the air out.
Once the flow looks steady, start the washer again and test the spray.
If your pressure washer nozzle is not spraying right, trapped air is one more easy thing to rule out.
Check the Soap Injector
If you use detergent, inspect the soap system.
Soap residue can dry inside the injector or nearby passages. That buildup can restrict flow and affect pressure. It can also send bits of dried residue into the nozzle later.
Flush the soap injector with clean water if your machine allows it. If the injector looks clogged, clean it according to the owner’s guide.
This step is worth doing if you often use cleaning solution and the spray problem keeps coming back.
Look for Pump or Pressure Problems
If you have tried the easy fixes and the pressure is still low, the issue may be deeper.
The pump, seals, or pressure control parts may be worn. These problems can cause weak spray, surging, or pressure loss across every nozzle.
You do not need to jump to that conclusion right away. But if every nozzle performs poorly and the water supply is fine, the machine may need more than a basic DIY repair.
It is still smart to check the simple things first. Many people assume the pump is bad when the real problem is much smaller.
Replace the Nozzle if It Looks Worn
Sometimes cleaning is not enough because the nozzle is simply worn out.
Over time, the opening can widen. When that happens, the water loses force. The spray pattern may become too wide, too weak, or uneven. If the tip looks damaged, scratched, or corroded, replacement is often the better move.
Nozzles are usually inexpensive. If one tip keeps causing trouble, swapping it out may be faster than trying to unclog pressure washer nozzle parts again and again.
How to Clean Different Types of Pressure Washer Nozzles
Not all nozzles work the same way. Most can be cleaned with the same basic method, but a few need extra care. If you know what type you have, you can clean it without causing damage.
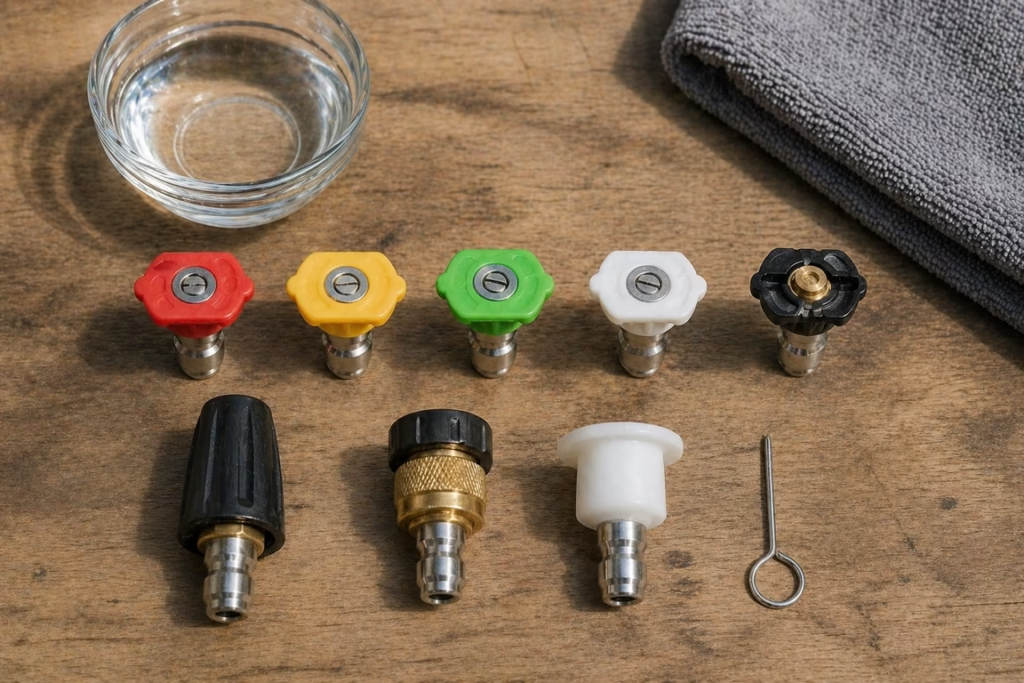
Quick-Connect Color-Coded Nozzles
These are the most common tips for home pressure washers.
They snap into the wand and usually come in a set. Each color creates a different spray angle. Because they are small and easy to swap, they also tend to collect dirt and mineral buildup over time.
To clean them, remove the tip, inspect the opening, and use a nozzle cleaning tool or thin wire to clear it. Then rinse it well and soak it in vinegar if needed.
This is the easiest kind of pressure washer nozzle cleaning. It is also the one most homeowners will do most often.
Turbo or Rotary Nozzles
Turbo nozzles are a bit different.
They create a strong spinning spray that helps remove stubborn dirt fast. Because they have moving parts inside, they need a gentler touch. You do not want to jam a thick tool into them or shake them around too hard.
Start by rinsing the tip and soaking it in warm water or vinegar if scale is present. If you use a cleaning pin, do it lightly. The goal is to clear the opening, not damage the inner parts.
If a turbo nozzle still sprays poorly after cleaning, it may be worn or stuck inside. In that case, replacement is often the best option.
Soap Nozzles
Soap nozzles usually have a wider opening. They are designed for low pressure and detergent flow.
Even though they clog less often with dirt, they can collect soap residue over time. That dried residue can narrow the opening and affect how the nozzle works.
To clean one, rinse it well after every use. If buildup is already inside, soak it in warm water and vinegar. Then brush the outside and flush it again.
If you want to remove debris from pressure washer nozzle tips used for soap, regular rinsing makes a big difference.
Adjustable Nozzles
Adjustable nozzles twist or slide to change the spray pattern.
They are handy, but they can trap grime in small moving spaces. Dirt, soap, and hard water deposits may build up inside the adjustment part, not just at the tip.
To clean one, follow the same basic method, but also rotate or adjust the nozzle while rinsing it. That can help loosen hidden buildup. If the parts feel stiff, soak the nozzle first and work it gently.
Avoid forcing it. If the adjustment ring or head feels stuck, a slow soak is safer than trying to muscle it loose.
A Simple Rule for Every Type
No matter which nozzle you have, the rule is the same.
Clean gently. Rinse well. And do not use tools that are too large or too sharp.
The goal is to clean pressure washer nozzle parts without changing the shape of the opening. Once that shape changes, the spray changes too.
Common Mistakes to Avoid When Cleaning a Pressure Washer Nozzle
Cleaning the nozzle is simple, but a few mistakes can make the problem worse. Some can even ruin the tip. If you want the fix to work, avoid these common errors.
Using the Wrong Tool
This is one of the biggest mistakes.
A thick nail, paper clip, or drill bit may seem handy, but it can damage the nozzle opening. If the hole gets wider or scratched, the spray pattern may never look right again.
Always use a nozzle cleaning tool, a proper cleaning pin, or the thinnest safe option you have. Work slowly and gently.
If you want to unclog pressure washer nozzle parts the right way, the tool matters.
Cleaning While the System Is Still Pressurized
Never skip the pressure release step.
If pressure is still trapped in the wand, the nozzle can pop out or spray water suddenly when you remove it. That is dangerous and messy.
Turn the machine off. Shut off the water. Then squeeze the trigger until the pressure is gone. Only after that should you start pressure washer nozzle cleaning.
A two-minute shortcut is not worth the risk.
Forcing Stubborn Buildup
If the clog will not move, do not force it.
Pushing too hard can damage the tip. It can also break off bits of debris and jam them deeper inside. If a gentle pass does not work, soak the nozzle in vinegar and try again later.
Patience works better than force here.
Ignoring the Water Supply
Sometimes people focus only on the nozzle and forget the rest of the system.
But if the hose is kinked, the inlet screen is clogged, or the water supply is weak, cleaning the tip may not solve anything. That can lead to wasted time and frustration.
If your pressure washer nozzle is not spraying right after cleaning, step back and check the full flow path.
Reusing a Damaged Nozzle
A worn nozzle can act like a clogged one.
It may spray unevenly. It may lose pressure. It may also clog more often because the opening is damaged. If the tip is cracked, rusted, or badly worn, replace it.
Trying to fix pressure washer nozzle problems with a damaged tip usually leads nowhere.
Using Harsh Chemicals Without Need
Strong cleaners are not usually necessary.
In most cases, warm water, vinegar, and a gentle tool will do the job. Harsh chemicals can damage seals, coatings, or small parts if they are not meant for that use.
Stick with simple cleaning methods unless the manufacturer says otherwise.
Skipping Routine Maintenance
The biggest mistake may be waiting too long.
A quick rinse after each use can stop many clogs before they start. So can flushing out detergent and storing the tips in a clean, dry place.
DIY pressure washer nozzle cleaning is easy when buildup is fresh. It gets much harder when grime sits for weeks or months.
How Often Should You Clean a Pressure Washer Nozzle?
There is no one perfect schedule for every machine. It depends on how often you use it, the type of water you use, and whether you run detergent through it. Still, a simple routine can help you avoid most clogs before they turn into bigger problems.
Check the Nozzle After Heavy Use
If you use your pressure washer for long jobs, check the nozzle when you finish.
Big cleaning tasks stir up more dirt. They also push more water through the system. That raises the chance of a clogged pressure washer nozzle, especially if the hose or water source carries grit.
You do not need a deep clean every time. A quick look and a rinse are often enough.
Clean It More Often if You Use Hard Water
Hard water can leave mineral deposits behind. Those deposits build up slowly, so the problem may sneak up on you.
If you live in an area with hard water, it makes sense to clean pressure washer nozzle tips more often. Even if the spray still looks fine, a small soak in vinegar now and then can help stop scale from building inside the opening.
This simple habit can save you from bigger trouble later.
Rinse the Nozzle After Using Detergent
Soap can leave residue behind if it is not flushed out.
If you use detergent, rinse the nozzle and wand after the job is done. This is one of the easiest ways to avoid pressure washer nozzle cleaning problems later. Dried soap can narrow the opening and change the spray pattern.
A fast flush takes less than a minute. It is worth doing every time.
Pay Attention to Changes in Spray Pattern
Your nozzle will often tell you when it needs attention.
If the spray looks crooked, weak, patchy, or uneven, that is your sign. If the machine starts pulsing or cleaning takes longer than usual, inspect the tip before you assume the whole washer has a problem.
Knowing how to unclog pressure washer nozzle parts is helpful. Knowing when to do it is just as important.
A Simple Maintenance Schedule
If you want an easy plan, use this:
- After each use: quick rinse and visual check
- Every few weeks during heavy season: deeper inspection and cleaning
- After detergent use: flush the nozzle and wand
- Before storage: clean, dry, and store the nozzles properly
This kind of routine keeps DIY pressure washer nozzle cleaning simple. It also helps your machine work better for longer.
How to Prevent Pressure Washer Nozzle Clogs
Cleaning a nozzle is not hard. But preventing the clog in the first place is even better. A few small habits can save time, improve performance, and help the nozzle last longer.
Use a Hose Filter
A hose filter is a simple upgrade with a big payoff.
It catches dirt and grit before they enter the washer. That means fewer particles reach the tip, where they can cause a pressure washer nozzle blocked problem.
If your water source is not perfectly clean, this one small part can make a big difference.
Flush the System After Every Use
This is one of the best habits you can build.
Run clean water through the machine for a short time after each job. This helps clear out dirt, soap, and leftover residue before it dries inside the nozzle or wand.
If you often clean pressure washer nozzle tips because of dried buildup, flushing the system may solve that problem before it starts.
Avoid Dirty Water Sources
Not all water is equal.
If the water source carries sand, rust, or sediment, the nozzle is far more likely to clog. Clean tap water is usually the safest choice. If you must use a questionable source, filtration becomes even more important.
Many nozzle problems begin before the water even reaches the machine.
Rinse Out Detergent Thoroughly
Soap is useful, but it should not stay in the system.
When the job is done, switch back to clean water and flush the washer. This helps remove detergent from the soap injector, hose, wand, and tip.
If you skip this step, dried soap can lead to a clogged pressure washer nozzle later on. It can also cause the nozzle to spray unevenly the next time you use it.
Store Nozzles in a Clean, Dry Place
Storage matters more than many people think.
Do not toss the tips into a dirty toolbox or leave them on a damp shelf. That can expose them to dust, rust, and grime. Instead, keep them in a small case or clean container where they stay dry and easy to find.
Good storage helps remove debris from pressure washer nozzle problems before they happen.
Replace Worn Parts Early
A nozzle is not the only part that can shed debris.
Old hoses, cracked fittings, and worn screens can send bits of rubber or rust into the system. Those pieces often end up in the nozzle opening.
If you keep getting the same clog, look beyond the tip. Replacing tired parts early can prevent repeat problems and save you from constant troubleshooting.
Build a Simple Habit, Not a Big Chore
Prevention works best when it feels easy.
You do not need a long checklist every time. Just rinse the system, check the nozzle, and store it properly. Those three small steps will prevent most of the common causes of pressure washer nozzle cleaning issues.
When to Replace Instead of Clean the Nozzle
Sometimes cleaning is the right fix. Sometimes it is not. If the nozzle is damaged or worn out, no amount of soaking or scraping will bring it back.
Knowing when to replace it can save you time and frustration.
The Spray Pattern Still Looks Wrong After Cleaning
If you clean the tip well and the spray still looks crooked or uneven, the nozzle may be worn.
A clean nozzle should produce a steady pattern. If the stream is still off after you remove debris from pressure washer nozzle openings, the shape of the opening may have changed.
Once that happens, replacement is usually the best move.
The Nozzle Opening Looks Worn or Enlarged
Nozzle openings are small for a reason. That small size helps create strong pressure.
Over time, the opening can widen from wear or from using the wrong cleaning tool. When that happens, the water loses force. The machine may still spray, but the cleaning power drops.
This kind of wear often looks like a pressure washer low pressure nozzle issue, even though the tip is no longer clogged.
The Tip Has Rust, Cracks, or Damage
Take a close look at the nozzle body.
If you see cracks, rust, chipped edges, or deep scratches, replace it. A damaged nozzle may not lock in properly. It may also spray unpredictably, which can make cleaning harder and less safe.
Trying to fix pressure washer nozzle trouble with a damaged tip usually wastes more time than it saves.
It Keeps Clogging Again and Again
A nozzle that clogs often may be worn inside.
Yes, the real cause could still be dirt from the hose or machine. But if one tip gives you trouble over and over while others work fine, that nozzle may be past its best days.
At that point, replacement is often easier than trying to unclog pressure washer nozzle parts every few uses.
Replacement Is Often Cheap and Easy
The good news is that most nozzles are not expensive.
For many homeowners, replacing a faulty tip is faster and more reliable than repeated cleaning. If the rest of the pressure washer works well, a new nozzle can make the machine feel strong again.
That is why it helps to keep a spare set on hand, especially if you use the washer often.
A Good Rule to Follow
Here is a simple rule.
If the nozzle is dirty, clean it. If it is damaged, worn, or still sprays badly after cleaning, replace it.
That approach keeps pressure washer nozzle cleaning simple and helps you avoid chasing the wrong fix.
DIY vs Professional Repair: When the Problem Is Bigger Than the Nozzle
Most nozzle problems are easy to fix at home. That is the good news. A quick cleaning often brings the spray back to normal. But sometimes the nozzle is not the real issue. It is just where the symptoms show up first.
Knowing when to keep going and when to stop can save you time, money, and a lot of frustration.
Try DIY First for Simple Spray Problems
Start with the easy checks.
If the spray is weak, uneven, or pulsing, it makes sense to begin with the nozzle, hose, inlet screen, and wand. These are the most common trouble spots. They are also the easiest to inspect.
In many cases, a little pressure washer nozzle cleaning is all it takes. You clean the tip, flush the system, and the machine works like normal again.
That is why DIY is the smart first move.
The Problem May Be Bigger if Every Nozzle Performs Badly
If you test more than one nozzle and all of them spray poorly, the issue may not be the tip.
This can point to a water supply problem, trapped air, a blocked filter, or a pump issue. If the pressure stays weak no matter which tip you use, it is time to think bigger.
A clogged pressure washer nozzle usually affects one tip. A deeper machine problem often affects all of them.
Watch for Leaks, Strange Sounds, or Pressure That Comes and Goes
Some signs suggest the problem goes beyond a dirty nozzle.
If water leaks from the pump, hose, or fittings, the machine may be losing pressure before it reaches the wand. If the unit makes odd sounds, struggles to stay steady, or surges badly during use, the issue may involve internal parts.
These problems do not always mean major repair. But they do mean the nozzle may not be the real cause.
Pump Problems Need More Caution
The pump is one of the most important parts of the machine. It is also one of the most expensive.
If the washer has very low pressure even after you clean pressure washer nozzle parts, flush the hose, and check the filter, the pump may need service. Worn seals, stuck valves, or internal wear can all reduce performance.
At that point, a professional inspection may be the better choice, especially if you are not comfortable opening the machine.
Professional Help Makes Sense When Repairs Stop Being Simple
Call for help when the fix is no longer clear.
If the machine loses pressure across every nozzle, leaks heavily, or still performs poorly after basic DIY checks, a repair expert may save you more time than trial and error. This is also true if the unit is still under warranty. Trying to take it apart yourself may make things worse.
A good rule is simple. If the problem is outside the nozzle, hose, screen, or wand, and you are not sure what comes next, get help before small damage turns into a bigger repair.
Start Small. Escalate Only if Needed.
There is no need to jump straight to the worst-case scenario.
Start with the nozzle. Then move through the simple checks. Most homeowners never need more than that. But if the pressure washer nozzle is not spraying right after you have done the basics, do not ignore the signs.
Smart troubleshooting means knowing when a quick DIY fix is enough and when the machine needs more.
Frequently Asked Questions
Can I clean a pressure washer nozzle with vinegar?
Yes, you can.
White vinegar works well for mineral buildup caused by hard water. If the nozzle looks chalky or crusted, soak it in vinegar for at least 30 minutes. Then rinse it, scrub it lightly, and test it again.
It is a simple way to remove debris from pressure washer nozzle tips without using harsh chemicals.
What tool should I use to unclog a pressure washer nozzle?
The best tool is a nozzle cleaning pin or nozzle cleaner.
Many pressure washers come with one. If you do not have it, use a very thin wire with a gentle touch. Avoid thick nails, paper clips, or anything that could widen the opening.
If you want to unclog pressure washer nozzle parts safely, the right tool matters.
Why is my nozzle still not spraying correctly after cleaning?
If the spray is still weak or uneven, the problem may not be the nozzle alone.
Check the hose for kinks. Inspect the water inlet screen. Flush the wand. Try another nozzle tip. If every nozzle performs badly, the machine may have a water flow or pump issue.
Pressure washer nozzle cleaning is the first step, but not always the final fix.
How do I know if the nozzle is worn out?
A worn nozzle often sprays badly even after cleaning.
The stream may stay uneven. The spray angle may look wrong. The pressure may feel weaker than normal. If the opening looks enlarged, scratched, rusty, or damaged, it is probably time to replace the tip.
Can hard water clog a pressure washer nozzle?
Yes, it can.
Hard water leaves mineral deposits behind. Over time, those deposits build up inside the nozzle opening and reduce water flow. This can lead to a pressure washer nozzle blocked problem even if no dirt or sand is present.
That is why vinegar soaks are often helpful.
How often should I clean pressure washer nozzles?
It depends on how often you use the machine.
A quick rinse and visual check after each use is a good habit. A deeper cleaning makes sense during heavy use, after detergent use, or any time the spray pattern changes.
Regular DIY pressure washer nozzle cleaning helps prevent bigger issues later.
Is it safe to use a needle to clean a pressure washer nozzle?
It can be, but only if the needle is very thin and you use it gently.
The risk is that a thick or sharp tool can damage the opening. A proper nozzle cleaning tool is always safer. If you use a needle, do not force it.
Should I replace the nozzle or keep cleaning it?
If the nozzle is dirty, clean it.
If it is damaged, worn, or still sprays poorly after cleaning, replace it. Nozzles are usually affordable, and replacement is often faster than repeated troubleshooting.
Final Thoughts: A Clean Nozzle Can Restore Pressure Fast
A clogged nozzle can make your pressure washer feel weak, slow, and frustrating to use. The good news is that this is often one of the easiest problems to fix.
If the spray looks uneven, the pressure drops, or the machine starts pulsing, start with the tip. A careful cleaning can often restore normal performance in just a few minutes. For many homeowners, that simple fix is all it takes.
The key is to work in the right order. Turn the machine off. Release the pressure. Remove the nozzle. Clear the blockage gently. Rinse it well. Soak it in vinegar if mineral buildup is the problem. Then test the spray again.
If the nozzle still does not perform well, do not panic. Check the hose, inlet screen, wand, and water flow next. In some cases, the issue may be bigger than the tip. But many of those problems are still manageable with a basic DIY approach.
The best long-term fix is prevention. Flush the system after each use. Rinse out detergent. Store the nozzles in a clean, dry place. Replace worn tips before they cause more trouble.
A little care goes a long way. And when you know how to clean pressure washer nozzle parts the right way, you can solve one of the most common pressure washer problems before it turns into a bigger repair.