1. Intro
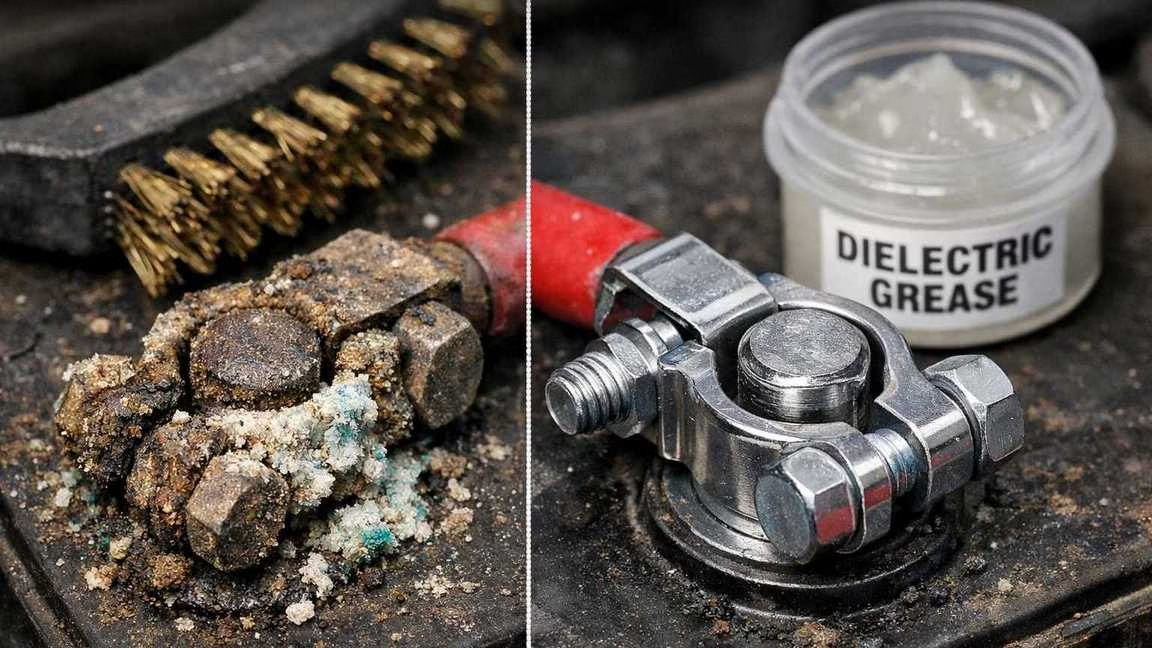
Battery terminal corrosion looks like crusty white, blue, or green gunk on your battery posts and cable clamps. It’s more than just ugly. This gunk blocks electricity flow. That causes slow engine starts. It makes lights flicker. It creates weird charging issues.
Most guides miss one big thing: cleaning is not enough. If you clean the terminals but don’t protect them, the gunk comes back fast. The real fix? Protection. That’s the step that keeps terminals clean for good.
2. What Causes Battery Terminal Corrosion
You don’t need science class to fix this. Just know these common causes:
- Acid leaks: All car batteries leak some acid vapor. This happens most at the posts. The vapor eats at metal and makes gunk.
- Too much charging: A bad alternator can overcharge your battery. This makes more acid vapor. More vapor means faster corrosion. If you’re seeing repeated issues, you might need to check your whole charging system health.
- Hot engine: Heat under your hood speeds up corrosion. It makes moisture dry in bad patterns. This leaves more gunk behind.
- Loose clamps: Wiggly cable clamps create tiny sparks. These hot spots speed up corrosion. Loose clamps also make your battery seem weak.
All these causes lead to the same problem. Corrosion blocks electricity right where your car needs it most.
3. Safety First (Mandatory)
Before you start, treat your battery with respect. One mistake can cost you big time.
Safety rules you must follow:
- Turn off the engine. Take out the key. Never work on a running car.
- Wear gloves and safety glasses. Battery gunk hurts skin and eyes. Batteries can spit gas. Don’t lean over them.
- Take off rings and watches. Metal jewelry can cause sparks. These sparks can melt metal fast.
Remove clamps in this order:
- Negative (black, minus sign) first
- Positive (red, plus sign) second
Why this order? The negative clamp connects to your car’s body. Remove it first to avoid short circuits. If you remove the positive first and your wrench touches metal, you get sparks. Big sparks. This can melt tools. It can fry your car’s electronics. It can even hurt you.
If your battery keeps dying even after cleaning, you might have a parasitic drain issue that needs separate attention.
4. The Correct Way to Clean Battery Terminals
This cleaning method works. It’s safe for beginners. No weird hacks needed.
What you need:
- Gloves
- Safety glasses
- Small wrench
- Stiff brush (nylon or special battery brush)
- Baking soda
- Clean water
- Rags or paper towels
- (Optional) Plastic cup and old toothbrush
Step 1: Cool down first.
Turn off the engine. Wait a few minutes. A hot battery leaks more acid. Plus, you don’t want to burn your hands.
Step 2: Remove the clamps in order.
Take off the negative (black) clamp first. Then remove the positive (red) clamp. Push the cables away so they can’t touch the posts.
Step 3: Make a baking soda mix.
Put one spoon of baking soda in a cup of water. This mix kills acid. It’s not magic. It won’t clean everything. You still need to scrub and check for damage.
Step 4: Apply the mix.
Dip a toothbrush or rag in the baking soda water. Dab it on the gunk. Cover the posts. Get inside the clamps. Hit the base of each terminal. Some fizzing is good. That means the acid is dying.
Step 5: Scrub well.
Use your stiff brush. Scrub until you see shiny metal. Focus on:
- All sides of the battery posts
- Inside the cable clamps
- Where the clamp meets the post
Don’t dig into the metal. Just remove the gunk. Use steady pressure. No need to scrape hard.
Step 6: Rinse lightly.
Use a damp rag. Or pour a little water. Wash away the gunk and baking soda. Don’t flood the battery. Just clean the parts you scrubbed.
Step 7: Dry everything.
Wipe all parts with a clean rag. Let them air dry. No water should stay on the metal. Water causes fast corrosion. It also blocks electricity flow.
Step 8: Check for damage.
Look closely at:
- Cable skin near clamps (cracks or swelling)
- Broken wires inside the cable
- Clamps that won’t tighten
- Metal that looks eaten away
- Wet spots around posts
If parts look bad, replace them. Cleaning won’t fix broken parts. Bad parts cause starting problems again.
Big warnings (read these!):
- Never use soda, vinegar, or cola on your battery. These are not real cleaners. They make messes. They can spread gunk.
- Never scrape hard with metal tools. You can damage posts and clamps. This removes metal protection. It makes corrosion worse later.
- Never put clamps back on wet metal. Water causes fast rust. It blocks electricity. Always dry first.
5. The Biggest Mistake: Cleaning Without Protection
Most people make this big mistake. They stop when the metal looks shiny. That’s why gunk comes back fast.
Clean metal is like fresh food. It spoils fast. Under your hood, you have:
- Wet air
- Acid vapor
- Heat
These things attack clean metal fast. Corrosion can return in weeks. It often comes back in months. This happens faster if:
- You live in a humid place
- You drive in stop-and-go traffic
- Your car sits unused a lot
Many folks think: “Clean means fixed.”
Nope. Clean is short-term. Protected is long-term.
To really stop battery corrosion, you need armor. This armor seals out wet air and acid. Put it on after cleaning.
If your car sits unused often, consider a battery maintainer to keep it healthy between drives.
6. What Actually Prevents Corrosion (The Right Grease)
The fix that lasts is simple: battery grease.
You’ll find two kinds at the store:
- Dielectric grease (made from silicone)
- Petroleum grease (made for batteries)
Both work if used right. Both do the same thing. They seal out air, water, and acid.
Let’s clear something up. Some folks fear grease “blocks electricity.” Not true when used right. Here’s why:
- The clamp squeezes tight on the post
- This squeeze pushes grease from contact points
- The leftover grease seals the edges
- Think of it as weatherproofing, not blocking
Dielectric grease vs. normal grease:
- Dielectric grease is made for electrical parts
- It lasts longer in heat and wet
- Regular grease can melt, separate, or wash away
- Sprays and oils don’t stay put long enough
What about cooking oil or WD-40? Skip them. They fail fast. They attract dirt. They turn sticky in heat. They move to places you don’t want them. For batteries, use real battery grease.
7. How to Apply Battery Terminal Grease (Properly)
Only do this when parts are clean and dry.
Step 1: Wait for dry parts.
Apply grease only after cleaning and drying. Never put grease on wet or dirty metal.
Step 2: Use just enough.
A thin coat works best. You’re sealing metal, not frosting a cake. Too much grease makes a mess. It also collects dirt.
Step 3: Put it in the right spots.
Apply a thin coat to:
- Outside of battery posts
- Inside of cable clamps
- (Optional) Base of posts after assembly
Don’t spread grease on other parts. It will trap dirt.
Step 4: Reconnect in reverse order.
- Positive (red) first
- Negative (black) last
Why this order? It stops accidental shorts. If you connect negative first and your wrench touches metal while tightening positive, you get sparks. With negative last, the risk is low.
Step 5: Tighten just right.
Clamps should not spin by hand. But don’t overtighten. You might crack the clamp. Loose clamps cause electrical problems. They also let corrosion come back.
8. What Not to Use (Myths & Bad Advice)
Bad battery tips spread fast. They sound easy. But they don’t work. Here’s what to avoid—and why.
Cola: It’s sticky. It leaves sweet sugar on your battery. You might remove some gunk. But you add a layer that pulls in dirt and water. Cola doesn’t kill acid. It doesn’t protect metal.
Vinegar: Vinegar is acid. Battery gunk is also acid plus metal bits. Adding more acid without a plan makes things worse. It spreads mess. It doesn’t protect metal later. Neutralizing and rinsing works. Pouring kitchen liquids doesn’t.
WD-40: It pushes away water. But it’s not for battery protection. It washes off fast. It moves to wrong places. It leaves a weak film. This film can’t block acid long-term. It’s not the same as real battery grease.
Cooking oils: They melt in heat. They pull in dirt. They weren’t made for electrical parts. Hot oil turns sticky. This makes your next cleaning job harder.
Internet hacks: Coins. DIY shims. Crazy tight clamps. Sanding posts hard. These are bad ideas. They cause poor contact. They damage posts and clamps. They make failures repeat. Battery terminals need:
- Clean metal
- Right clamp tightness
- Stable protection
No improvising needed.
For real results, do two things:
- Clean safely
- Use real battery grease
That’s the only way to stop corrosion for good.
9. How Often This Should Be Done
No perfect schedule exists. Your weather and driving change the need. Use these simple checks:
- Quick look: Every few months. Or when you check oil. Look for:
- White powder
- Wet spots
- Fuzzy or colored clamps
- Hot or wet places: Check more often. Water and salt make corrosion faster.
- After battery work: Look again in two weeks. A loose clamp or bad charger can cause fast corrosion.
- Warning signs: These mean it’s time to clean again:
- Engine cranks slow
- Car won’t start sometimes
- Lights flicker
- Battery light comes on
- You see gunk on posts
If gunk keeps coming back fast, look deeper. Check for:
- Loose clamps
- Bad cables
- Overcharging system
Sometimes the problem isn’t just dirt. You might need to test if your battery is actually failing or if it’s time for a replacement, especially if you have an AGM battery which has different care requirements.
10. Conclusion
Cleaning battery terminals works fast. You’ll get:
- Better starts
- Steadier electronics
- Fewer charging issues
But cleaning only fixes symptoms.
For a fix that lasts, add protection. Put battery grease on clean, dry parts. This thin coat blocks water and acid. It protects your battery. It makes your starter last longer. It keeps charging strong.
Do it right:
- Stay safe
- Follow clamp order
- Skip internet hacks
Turn a constant headache into easy car care.
And remember – if you find yourself jump-starting your car often even after cleaning terminals, you might need a reliable portable jump starter for emergencies while you diagnose the deeper issue.
 1")