Let’s get this out of the way immediately: Toothpaste does not work.
Neither does bug spray, WD-40, or those “magic wipes” you see on TikTok. Sure, they make the lens look clear for about three days because the oil fills in the scratches. But the second it rains, that oil washes off, and your lights look like cataracts again.
The only way to actually fix cloudy headlights is to physically sand off the dead plastic and apply a new UV Clear Coat. If a kit says “No Sanding Required,” it is a scam.
I analyzed threads from r/AutoDetailing and r/Cars to find the only three kits that require a little elbow grease but actually last longer than a week.
: Cerakote vs. 3M 1")
Cerakote Ceramic Kit
The Brutal Verdict: Buy this if you are willing to sand by hand. It uses a chemical ceramic coating that bonds to the plastic and actually lasts for years, not months.
Check Price on Amazon →: Cerakote vs. 3M 2")
3M Ultra (Drill Mounted)
The Brutal Verdict: Buy this if you have a power drill and zero patience. It removes heavy oxidation 5x faster than hand sanding, but it can be messy.
Check Price on Amazon →: Cerakote vs. 3M 3")
Sylvania Restoration Kit
The Brutal Verdict: Buy this if you prefer a traditional “Hard Clear Coat” over ceramic. It puts a physical layer of UV protection on the lens that feels like factory new.
Check Price on Amazon →How to Use a Headlight Restoration Kit: Step-by-Step Guide for Crystal-Clear Results
Ready to tackle foggy headlights yourself? Many drivers search for how to use headlight restoration kit or the best DIY headlight restoration kit because it’s an easy weekend project. Whether you’re choosing the best headlight restoration kit with UV protection like Cerakote or a drill-based option like 3M, the process is straightforward. Follow these steps for professional-looking results.
- Clean the headlights. Wash thoroughly to remove dirt. This prevents scratches during sanding.
- Tape around the lenses. Protect your paint with masking tape—essential for any best at-home headlight restoration kit.
- Sand the oxidation. Start with coarser grits and progress to finer ones. Drill kits like the best 3M headlight restoration kit speed this up, while no-drill options like Cerakote use wipes for ease.
- Polish for clarity. Apply the included compound to restore shine. This step makes a huge difference in the best car headlight restoration kit reviews.
- Apply UV protection. Seal with a clear coat or ceramic wipe. Kits with strong UV blockers, such as the best headlight restoration kit that lasts, prevent re-oxidation.
Pro tip: Work in shade and allow full cure time. You’ll love the brighter beams and fresh look—perfect for anyone wondering what is the best headlight restoration kit to buy in 2026.
Frequently Asked Questions About Headlight Restoration Kits (2026 Update)
Do headlight restoration kits really work?
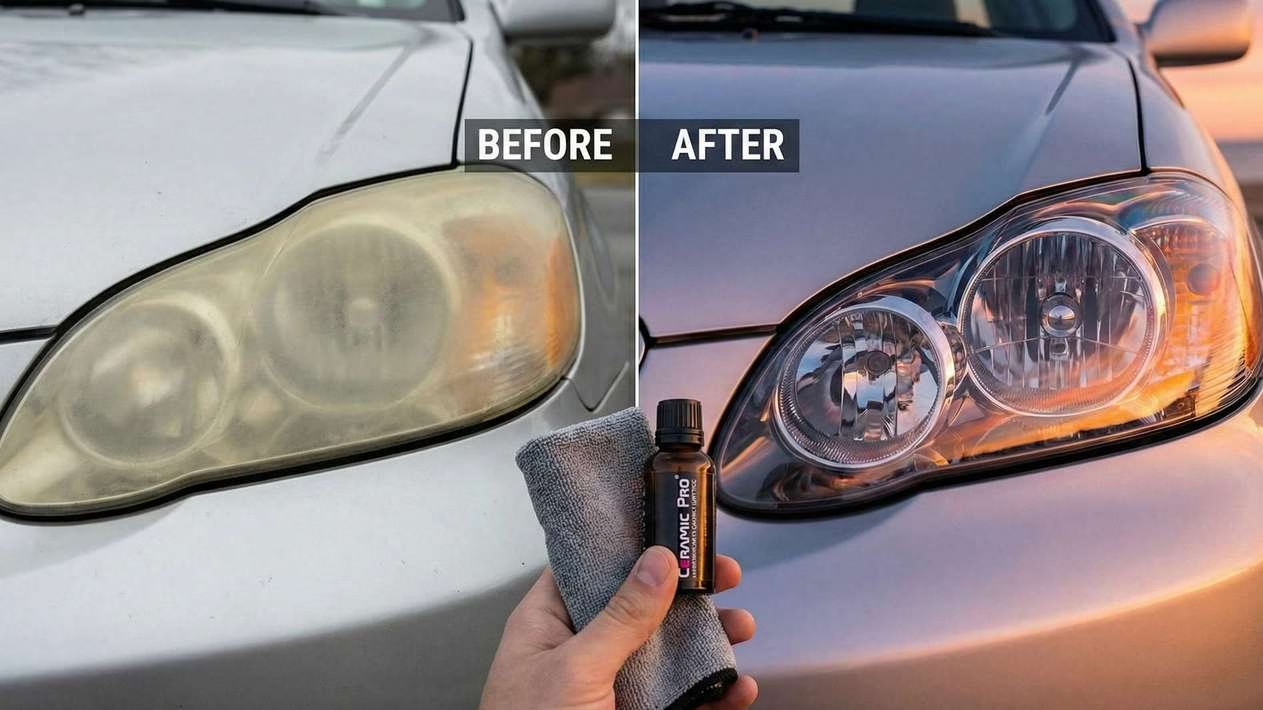
Absolutely. Quality kits remove oxidation and haze effectively. Reddit users often rave about the best headlight restoration kit Reddit picks, with dramatic before-and-after results. They restore visibility and make your car look years younger.
How long do headlight restoration kits last?
Results vary, but top kits with UV protection last 1–3 years or more. The longest lasting headlight restoration kit often includes ceramic coatings like Cerakote. Factors like sun exposure and climate play a role—reapply sealant for extended clarity.
What is the best headlight restoration kit on the market?
In 2026, Cerakote and 3M top many lists for durability and ease. If you’re asking which headlight restoration kit is best, it depends: Cerakote for no-tools simplicity, 3M for heavy oxidation. Check Reddit reviews for the latest best headlight restoration kit 2025 insights carrying into the new year.
Cerakote vs. 3M: Which is better?
Cerakote shines for quick, long-lasting ceramic protection—ideal as the best ceramic headlight restoration kit. 3M excels at deep cleaning with drill power, great for severe cases. Many prefer Cerakote for everyday use based on best headlight restoration kit reviews.
Is a professional or store-bought kit better?
Store-bought options like those from Walmart or Amazon are excellent for DIY savings. The best store bought headlight restoration kit can match pro results if you follow instructions. Go professional for guaranteed longevity on high-value vehicles.
1. Cerakote Ceramic Kit: The “Permanent” Fix
Cerakote Ceramic Kit
- Lifetime Guarantee: The only kit confident enough to promise it won’t re-oxidize.
- No Power Tools: Designed for hand sanding (requires effort, but safer for paint).
- Ceramic Bond: Sheds water and UV rays better than traditional clear coats.
This kit is the gold standard. Why? It uses a special ceramic coating. This coating forms a hard shell over your plastic headlights. That shell stops oxidation from coming back.
Forget the “Easy” Marketing
The box says it’s a simple 3-step process. That’s not quite true. The included wipes are just a start. The real work is in the sanding.
You must sand thoroughly. If you rush and leave scratches, the ceramic will seal them in forever. The result will look bad.
- A user says: “Don’t believe the ‘easy’ part. I spent 45 minutes on each light. My arm was tired! But two years later, they still look new.”
The Bottom Line
Buy this if you want to do the job once and forget it. Avoid it if you have weak wrists or hate sanding.
2. 3M Ultra Restoration Kit: The “Drill” Method
Is your headlight yellow and crusty? Hand sanding could take hours. This kit saves the day. It connects to a standard power drill. It removes heavy oxidation in seconds.
It’s Powerful, But Messy
The kit promises a “pro result.” It delivers, but be ready for a mess. The drill spins fast. It will fling a white, pasty sludge all over your car.
You must tape off your paint first. The kit includes tape. If you skip this, you might sand the paint off your fender.
- A user says: “This kit is a beast. It fixed my cloudy 2008 Tacoma lights. Just cover your car before you start. Wash it right after.”
The Bottom Line
Choose this for badly damaged lights. You need a drill and must tape everything off. It’s a time-saver that demands care.
3. Sylvania Restoration Kit: The “Old School” Clear Coat
Before Cerakote, this was the top choice. It uses a thick, UV-blocking clear coat. You wipe it on at the end. This liquid fills in small sanding marks beautifully. You get a glass-like shine.
The Warranty Isn’t the Star
Sylvania offers a “Lifetime Warranty.” Users say it’s hard to actually use. Lots of forms and registrations. Buy this kit for the clear coat, not the warranty.
- A user says: “The final coat is magic. It hid my sanding mistakes. It takes a few hours to dry, but the gloss is amazing.”
The Bottom Line
Go with Sylvania if you want a deep, glossy finish. It’s more forgiving if your sanding isn’t perfect. Just be patient while it dries.
Restoration Hacks: Stop the Yellow Return
Headlights turn yellow because the factory UV coating failed. If you just polish them without re-sealing, they will turn yellow again in 90 days.
Final Verdict: Which Kit Is For You?
Making a choice is simple.
- The “One and Done” Buyer: Get the Cerakote Ceramic Kit. It bonds strong and lasts the longest.
- The “Heavy Duty” Job: Get the 3M Ultra Kit. Its drill power chews through the worst yellowing.
- The “Gloss” Hunter: Get the Sylvania Kit. Its thick clear coat gives a showroom shine.
✨ Complete Exterior Restoration
You fixed the headlights. Now fix the rest of the car with these Reddit-verified tools.
Best LED Bulbs
Your lens is clear, but your halogen bulbs are still dim. Here are the ones that don’t blind oncoming traffic.
Best Wiper Blades
Don’t scratch your new glass. Bosch Icon vs Rain-X Latitude: We tested the streak-free winners.
Best Ceramic Spray
Protect your paint just like you protected your headlights. The $20 sprays that last 6 months.
Best Car Vacuums
The outside is clean. Now fix the inside. The only handheld vacuums that actually lift dog hair.
: Cerakote vs. 3M 5")