It’s maddening when your Pinecil V2 claims it’s at 350–400°C… and the solder just sits there like a bored pebble. In a car, this gets worse because automotive wire and terminals suck heat away fast, and you’re usually working near plastic you really don’t want to melt.
Affiliate disclosure: This post contains affiliate links. If you buy through them, we may earn a commission at no extra cost to you.
If you want the full “which iron should I buy” roundup first, here’s the parent guide.
The real reason it “won’t melt solder” in a car
This problem is almost never mysterious. It’s usually one of these:
- You’re starving the iron (power problem) Pinecil V2 can run on lots of power setups. That’s the blessing and the curse. A weak USB-C adapter, a bargain cable, or a multi-port charger that downshifts under load will make the iron “look hot” on-screen but act cold at the joint. On automotive wire, you feel it immediately.
- You’re using the wrong tip shape (heat transfer problem) A needle tip on stranded copper is pain. It doesn’t have the thermal mass or contact area. It heats solder on the tip, not the wire. That’s how you get those sad little blobs that refuse to wick into strands.
- Your joint is dirty / oxidized (chemistry problem) Automotive wire lives in grime, vibration, and temperature swings. Oxidation and contamination stop solder from wetting. No flux = no flow. Period.
- You’re feeding solder to the wrong place (technique problem) If you melt solder on the tip and “paint” it onto the wire, you’ll get weak joints and frustration. You want to heat the wire/joint first, then feed solder into the joint so it wicks.
- You’re trying to solder something you shouldn’t (repair method problem) Some vehicle repair standards prefer crimp + adhesive-lined heat shrink because a soldered joint can become a stiff hinge that fatigues if strain relief is poor. If the splice is in a high-vibration spot, solder-only repairs can crack later unless you reinforce it properly.
The quick fix (read this before you start “troubleshooting”)
Do this in order. It solves the problem for most people in under 5 minutes:
Step 1: Change power first (don’t touch temperature yet)
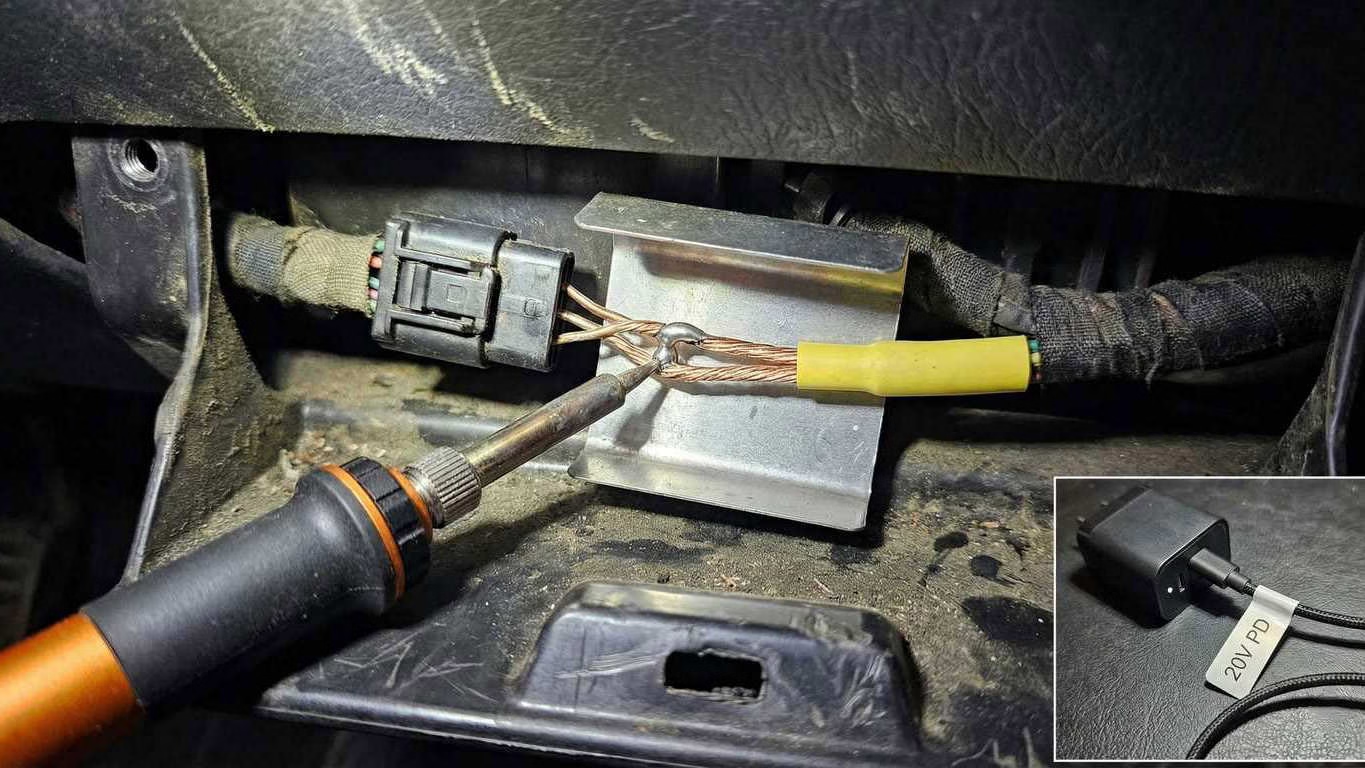
- If you’re on USB-C: use a real USB-C PD charger that can supply 20V (common with 60–65W laptop-class chargers).
- Use a decent USB-C cable that can actually handle the current. Thin, cheap cables sag voltage and the iron suffers.
- If you have the option: use the DC barrel input with a solid 19–24V supply. This often stabilizes performance on heavy joints.
Step 2: Switch to a chisel/bevel tip
- More contact area. More thermal mass. Faster heat transfer.
- Needle tips are for tiny PCB pads, not heat-soaked car wiring.
Step 3: Add flux like you mean it
- Add rosin flux to the wire and splice area.
- Re-tin the tip (fresh solder on the tip improves heat transfer).
Step 4: Heat the work, not the solder
- Touch tip to the wire/joint first.
- Feed solder into the joint (not onto the tip).
Step 5: Protect the plastic
- If you’re near connectors/loom: slide a thin metal shield behind the joint (even a scrap of aluminum sheet works).
- Use heat shrink for strain relief (adhesive-lined is best for cars).

Power + Tip + Flux
The Brutal Verdict: Don’t raise temperature yet. Fix power delivery, switch to a chisel/bevel tip, add flux, and feed solder into the joint.
See the main guide →The diagnosis (what to check when it still won’t work)
Use this like a decision tree.
1) The tip won’t hold solder (it beads up or looks dull)
What it usually means:
- Oxidized tip, dirty tip, or you’ve overheated it and cooked the plating.
Fix:
- Clean gently (brass wool is better than a soaking wet sponge).
- Apply fresh solder immediately to re-tin.
- Use flux on the joint so you’re not relying on a “perfect tip” to do magic.
If the tip is black and refuses to take solder, it may be done.
2) Solder melts on the tip, but won’t wick into the wire
What it usually means:
- The wire isn’t hot enough, or the wire is dirty/oxidized, or you’re not using flux.
Fix:
- Put flux directly on the stripped strands.
- Heat the wire first (not the solder).
- Feed solder into the strands until it wicks and you can see it soak in.
3) It works on a bench… but fails under the dash
What it usually means:
- Your power source is sagging under load, and the joint is heat-soaking faster than the iron can recover.
Fix:
- Swap power source before you change technique.
- If you’re on USB-C, use a known-good PD brick and a good cable.
- If you can use DC barrel input, that’s often more stable for “car wire” work.
4) You’re melting insulation and still not getting a good joint
What it usually means:
- Wrong tip shape + weak power combo. You’re camping too long.
Fix:
- Bigger tip (chisel/bevel).
- Better power.
- Shorter dwell time.
Step-by-step: A car-wire splice that actually holds
Step 1: Prep the wire like you care
- Strip cleanly (don’t nick strands).
- Twist strands lightly (don’t over-twist into a rope).
- Slide heat shrink on first. Everyone forgets once.
Step 2: Pre-tin the wire ends
- Add flux to the strands.
- Touch tip to wire, then feed solder into wire until it wicks.
You’re not trying to create a big blob. You’re trying to coat strands so they fuse quickly later.
Step 3: Make the splice (Western Union / overlap splice)
- Overlap and twist so the splice has mechanical strength before solder.
- Then solder it so the solder reinforces the strands instead of being the only thing holding it.
Step 4: Add strain relief (this is why solder joints crack)
- Adhesive-lined heat shrink is best for cars.
- Shrink it so it seals and supports the joint edges.
- If the splice is in a high-movement spot, add a second larger heat shrink layer for stiffness transition.
Step 5: Heat-shield nearby plastic
- Put a thin metal guard behind the joint if you’re near connectors/loom.
- Work fast. Touch the joint, get flow, get out.
How to Stop a Portable Iron From Feeling Weak on Car Wire
Portable irons fail in cars for two dumb reasons: starving power and bad heat transfer. Fix those and they suddenly act expensive.
Final note (so you don’t waste another hour)
If your Pinecil V2 “won’t melt solder” on car wire, don’t spiral. Fix power first, then tip shape, then flux/technique. Cranking temperature is the lazy move, and it usually just burns tips and melts plastic while the joint stays bad.
When you’re ready, I can generate the next silo page (the comparison post: Pinecil V2 vs TS101) so the cluster ties together cleanly.